Tag: Skill Progression

Beast From Beyond Easter Egg Steps And Requirements
The Beast From Beyond serves as the thrilling finale to the Call of Duty: Infinite Warfare Zombies saga, bringing players to an abandoned ice-world facility infested with lethal Cryptids. Completing the main Easter egg quest requires a blend of map knowledge, tactical communication, and precise execution across multiple intricate steps. Understanding the core requirements before jumping into the match will significantly increase your chances of surviving the final boss encounter.
Essential Map Setup and Gear Preparation
Before attempting the main quest, players must restore power to the station by locating N31L's head in the Ops Center and placing it on the main console in the spawn area. Repairing the bridge to access the Pack-a-Punch machine is also vital, requiring three distinct parts scattered around the Medical Bay, Cargo Bay, and Theater. Equipped players should focus on upgrading high-damage weapons like the Kendall 44 or powerful LMGs to handle incoming elite enemies.
Acquiring the Entangler Tactical Tool
Unlocking the Entangler is a crucial step that enables players to manipulate specific quest items throughout the environment. To obtain it, players need to complete the opening steps of the Skullbreaker quest by destroying a hidden box with explosives and defending red activation spots in the Cargo Bay. Successfully catching the floating skull grants access to the Entangler in the center of the Cargo Bay floor.
Solving the Floppy Disk and N31L Hack Puzzles
Using the Entangler, players must collect four floppy disks hidden across various sections of the facility, including behind grates and inside the forcefield room. Inserting these disks into N31L in the correct sequence relies on deciphering symbols found on paper scraps located in the map. After restoring N31L, players must solve a dial alignment puzzle in the Medical Bay to complete the terminal hack.
Confronting the Cryptid Boss Encounter
Once N31L's head is escorted to the Pack-a-Punch computer room, team members can interact with the terminal to trigger the final battle. The multi-phase arena encounter forces players to clear waves of Cryptid Scouts, Phantoms, and Rhinos while maintaining active terminal countdowns. Defeating the final dual Mammoth Cryptids demands constant mobility, careful management of blue flame hazards, and relentless concentrated firepower.

Ancient Dragon Smithing Stone Locations And How To...
Upgrading standard armaments to their maximum potential in Elden Ring requires a rare upgrade material known as the Ancient Dragon Smithing Stone. Because these stones are limited per playthrough, knowing where to find them and how to secure them is crucial for endgame builds. This guide breaks down key locations in both the Lands Between and the Shadow Realm to help you maximize your arsenal efficiently.
Finding Stones Through NPC Questlines
Several Ancient Dragon Smithing Stones are tied directly to character questlines throughout the game. Completing Nepheli Loux's storyline unlocks one stone as a direct reward from her in Stormveil Castle's throne room. Additionally, Gatekeeper Gostoc will offer a second stone for purchase in the same throne room once Nepheli's quest concludes.
Another stone can be obtained by aiding Witch-Hunter Jerren at the conclusion of Sorceress Sellen's questline near the Raya Lucaria Grand Library. Alternatively, players who deliver nine Deathroots to Gurranq in the Bestial Sanctum will receive a stone as his final gift.
Exploring Late Game Regions in the Lands Between
Late game areas contain multiple stones resting on corpses or dropped by formidable foes. In Crumbling Farum Azula, a stone drops from the lightning-summoning dragon stationary near the plaza southeast of the Dragon Temple Rooftop. Nearby floating ruins and curved platforms also host additional stones guarded by tough enemies.
The Consecrated Snowfield offers several opportunities, including a drop from two Night's Cavalry guarding a night carriage. You can also loot one from a corpse inside Yelough Anix Tunnel or on a ledge near Great Wyrm Theodorix. Meanwhile, exploring Miquella's Haligtree rewards diligent explorers with stones tucked in chests and under guarded statues.
Uncovering Smithing Stones in the Realm of Shadow
The Shadow of the Erdtree expansion adds several new Ancient Dragon Smithing Stones across its rugged landscape. Dungeons such as the Ruined Forge Lava Intake and Taylew's Ruined Forge feature altars and balconies where these materials can be retrieved. Defeating boss encounters like the Magma Wyrm inside the Dragon's Pit also yields a stone.
Venturing into the treacherous Jagged Peak region rewards players with stones dropped by Ancient Dragon Senessax or looted near Skeletal Slimes. Another stone rests atop the Suppressing Pillar inside a chest located in Gravesite Plain. Tracking down these locations ensures your favorite non-somber weapons reach maximum weapon scaling.

Red Dead 2 Where To Sell Jewelry For...
Looting enemy camps and searching abandoned cabins across the frontier in Red Dead Redemption 2 often yields valuable jewelry like gold rings, pocket watches, and silver chains. However, standard shopkeepers and general store clerks will refuse to buy these stolen or ill-gotten goods from players. Finding the right black-market merchants is essential for converting these small treasures into spending money.
Locating the Black Market Fences Across the Frontier
Specialized merchants known as Fences are the only vendors willing to buy stolen jewelry and pocket watches in the game. The primary fence location is unlocked at Emerald Ranch after progressing through the early Chapter 2 story mission called The Spines of America. Players can also travel early to other fences located in Saint Denis, Rhodes, and Van Horn Trading Post.
Visiting any fence allows players to quickly clear out accumulated valuables from their satchels in exchange for cash. Keeping track of fence locations helps prevent your inventory from clogging up with duplicate watches and rings.
Unlocking the Emerald Ranch Fence Early
While the fence at Rhodes is accessible without prerequisites, many players prefer unlocking Seamus at Emerald Ranch. Completing Hosea's stagecoach robbery mission establishes Seamus as a permanent buyer for stolen goods and wagons. Once unlocked, his barn becomes a convenient stopping point during journeys through the central region of the map.
Returning to Emerald Ranch after heavy exploration runs ensures a steady stream of income for weapon upgrades. It provides a reliable routine for outlaws looking to liquidate assets safely.
Choosing Between Selling and Crafting
Before selling off every piece of jewelry in your satchel, players should inspect item descriptions carefully. Certain rare trinkets, brooches, and crafting components are required to craft unique talismans at the fence. Selling these unique items prematurely can prevent you from unlocking powerful permanent perks for Arthur.
Standard items like common silver watches and gold buckles can always be sold without hesitation. Balancing immediate financial gains with long-term crafting needs maximizes overall gameplay efficiency.
Donating Valuables to the Gang Camp
Besides selling jewelry directly to a fence, players can also contribute valuables to the ledger at the main camp. Donating items increases camp funds, which allows players to unlock fast travel and better supply wagons. This strategy benefits the gang's overall living conditions while steadily improving your camp upgrades.
Deciding whether to sell for personal cash or donate to the camp ledger depends on your immediate gameplay goals. Both options ensure your collected jewelry never goes to waste.

Dead Space New Game Plus Features and Rewards
Completing the intense campaign of the Dead Space remake is a major milestone for horror enthusiasts, but the journey through the USG Ishimura does not have to end when the credits roll. The inclusion of a robust New Game Plus mode offers players a compelling reason to step back into Isaac Clarke's boots for a second playthrough. With fresh gameplay mechanics, exclusive upgrades, and new narrative secrets waiting to be uncovered, this mode completely transforms the survival horror experience.
What Carries Over into Your Next Run
When starting a New Game Plus file, players preserve a significant portion of their progression from the previous run. All unlocked weapons, suit upgrades, credits, and collected schematics carry directly over to your new save. You can reclaim your weapons and inventory items as soon as you access the first store on the flight deck.
However, key narrative progression items and abilities do not transfer immediately. You will need to regain your stasis and kinesis modules through story progression, and security clearances are reset. This design ensures that the natural flow of exploration and story pacing remains intact throughout the ship.
Exclusive Rewards and Upgrades Unlocked
Finishing the main story rewards players with substantial resources to kickstart their secondary campaign. Upon starting New Game Plus, you immediately receive 50,000 extra credits and ten Power Nodes to continue upgrading your equipment. These additional resources make it much easier to fully max out your weapon trees and suit stats.
In addition to currency and nodes, players gain access to the Level 6 Advanced Soldier Rig schematic. This unique suit provides superior damage protection and higher armor stats compared to any suit in the initial playthrough. Buying this upgrade drastically boosts Isaac's durability against late-game threats.
New Threats and Phantom Necromorphs
New Game Plus is not just about feeling overpowered; it also ramps up the overall difficulty and tension. Players will encounter Phantom Necromorphs, which are menacing, highly aggressive variants of standard enemies. These phantom variants deal significantly more damage and require focused dismemberment to kill.
The altered enemy spawns force players to adapt their combat strategies constantly. Even in early chapters, encountering these enhanced monsters keeps experienced players on edge. Managing your ammo reserves and choosing the right weapon for each encounter becomes more critical than ever.
Unlocking the Secret Alternate Ending
One of the most intriguing features of New Game Plus is the ability to unlock a brand-new secret ending. To view this alternate conclusion, players must explore the Ishimura to gather 12 hidden Marker Fragments scattered across the ship. These collectibles only spawn during a New Game Plus run.
Once all 12 fragments are collected, you must place them in Captain Mathius's quarters before reaching the story climax. Fulfilling this hidden requirement completely alters the final narrative outcome and offers fresh lore for dedicated fans. It serves as the ultimate reward for thoroughly exploring every corner of the ship.

Dark Souls 2 Moonlight Greatsword Location And Weapon...
The Moonlight Greatsword is one of the most legendary weapons in FromSoftware history, making a grand return in Dark Souls 2 with unique mechanics and high intelligence scaling. Unlike physical heavy weapons, this iconic blade inflicts pure magic damage, making it a dream choice for sorcery builds and battlemages alike. Understanding how to obtain this weapon and optimize its stats ensures you can harness its full potential in your journey through Drangleic.
How to Acquire the True Moonlight Greatsword
Obtaining the true Moonlight Greatsword requires players to venture into New Game Plus or use a Bonfire Ascetic in Brightstone Cove Tseldora. You must defeat the Duke's Dear Freja on higher difficulty to earn the Old Paledrake Soul, which represents the soul of Seath the Scaleless. Once you have acquired this rare boss soul, travel to Straid of Olaphis in the Lost Bastille to trade it for the weapon.
It is important not to confuse the genuine weapon with the fake Bluemoon Greatsword obtained through Benhart of Jugo's questline. While the fake counterpart scales with physical strength, the real version relies entirely on magic power for its offensive capabilities. Securing the genuine soul guarantees you get the true magic-projecting broadsword.
Weapon Stats and Intelligence Scaling
The Moonlight Greatsword requires 18 Strength, 18 Dexterity, and 18 Intelligence to wield effectively. It features an impressive A-rank scaling in Intelligence right out of the box, which quickly upgrades to an S-rank when infused with Magic. Because it deals purely magic damage, physical defense stats on enemies are completely bypassed when striking your foes.
Players looking to maximize their damage output should prioritize increasing their Intelligence stat toward the soft cap. Infusing the weapon at Steady Hand McDuff's workshop further boosts its base magic scaling, making it hit exceptionally hard against opponents with low magic resistance. Upgrades require Petrified Dragon Bones, so saving your upgrade materials for this weapon is highly recommended.
Unique Special Attacks and Durability Management
One of the most defining features of the Moonlight Greatsword is its heavy attack projectile feature. When executing a heavy two-handed or one-handed swing, the blade unleashes a glowing crescent wave of magic energy that can hit targets at a distance. This ranged beam deals massive damage and provides great crowd control against grouped enemies.
However, unleashing these magical beams consumes a portion of the weapon's overall durability with every cast. To prevent the blade from breaking during intense boss fights or long exploration routes, carrying repair powder or equipping the Bracing Knuckle Ring is essential. Managing durability carefully allows you to maintain continuous ranged pressure without risking weapon failure.
Best Builds and Combat Strategies
Integrating the Moonlight Greatsword into a dedicated sorcerer build allows players to transition smoothly between spellcasting and melee combat. Pairing this sword with high-tier staves ensures that you remain lethal at any distance while saving spell uses for crucial moments. Furthermore, combining the weapon with defensive sorceries like Great Magic Shield can create a versatile frontline battlemage setup.
In player-versus-player encounters, the wide horizontal swings of the broadsword move set excel at catching opponents who attempt to roll past you. Mixing up basic light attacks with delayed projectile heavy attacks can easily throw off the timing of enemy dodges. Mastering these pacing changes makes the weapon a formidable tool in both single-player campaigns and competitive duels.

Fallout New Vegas Brotherhood Of Steel Faction Guide...
The Brotherhood of Steel in Fallout: New Vegas represents a once-mighty technocratic military order pushed to the brink of total extinction. Confined to their subterranean bunker in Hidden Valley, this secretive chapter struggles against external enemies and internal ideological stagnation. Understanding their complex history and questlines allows players to properly navigate their impactful role in the fate of the Mojave Wasteland.
The Downfall and Origins of the Mojave Chapter
Originally sent east to secure advanced technology across the region, the Mojave Chapter of the Brotherhood initially established a strong presence under Elder Elijah. However, their devastating defeat against the New California Republic during Operation: Sunburst at HELIOS One crippled their military power. Over half of their paladins were wiped out during the battle, forcing the survivors into hiding.
Following their retreat, the chapter instituted a strict lockdown inside the Hidden Valley facility under the command of Elder McNamara. This isolationist stance saved the remaining personnel from immediate destruction, but it severely limited their influence across the wasteland. Internal morale steadily declined as critical bunker systems, such as air filtration, began to fail over time.
Finding the Hidden Valley Bunker and Key Quests
Locating the Brotherhood requires players to travel into the sandstorm-heavy fences of Hidden Valley. Players can gain entry by bringing the companion Veronica Santangelo along or by obtaining keycards from fallen Brotherhood patrols. Upon entering the bunker, players are confronted by paladins and must complete tasks to prove their trustworthiness.
Initial missions involve helping Elder McNamara gather intel on surface conditions or aiding Head Paladin Hardin with internal investigations. Completing these tasks grants players access to high-tier energy weaponry and rare power armor training. These early interactions serve as the foundation for determining the ultimate fate of the chapter.
Resolving the Leadership Dispute Between McNamara and Hardin
A central narrative conflict within the Mojave chapter is the leadership rivalry between Elder McNamara and Head Paladin Hardin. McNamara advocates for caution and maintaining the lockdown to ensure long-term survival. Conversely, Hardin believes the chapter should return to an aggressive stance and actively reclaim technology across the region.
The Courier can influence this political struggle by either assisting Hardin in breaking the Chain That Binds or supporting McNamara's cautious protocol. Choosing Hardin shifts the chapter toward a warlike trajectory that limits future diplomatic options with rival factions. Supporting McNamara keeps the chapter isolated but preserves opportunities for strategic alliances.
Endings and Strategic Alliances in the Mojave Wasteland
The Brotherhood of Steel plays a crucial role during the endgame preparations for the Battle of Hoover Dam. Major factions like Mr. House and Caesar's Legion view the chapter as an inherent threat that must be entirely destroyed. However, an NCR alliance remains possible if McNamara stays in power and peace terms are negotiated.
If a truce with the NCR is forged, the Brotherhood helps patrol the roads and supports troops during the final confrontation. Conversely, failing to secure peace or opting to destroy the bunker alters the balance of power across the Mojave forever. Players must carefully weigh the lore, rewards, and ethical outcomes when determining how to interact with this legendary faction.

Sword Dance Elden Ring Location And How To...
Finding the right combat abilities in Elden Ring can drastically alter your offensive capabilities during challenging encounters. Among the most versatile melee skills available early to mid-game is the Ash of War: Sword Dance, known for its swift forward movement and fluid slashing combinations. Understanding where to find this item allows players to incorporate high stance damage and mobility into their preferred build.
Where to Find the Sword Dance Ash of War
The Sword Dance Ash of War is located in the southwestern region of Liurnia of the Lakes. Players can reach this area by traveling south from the Revenger's Shack Site of Grace toward the cliffside beneath the local Minor Erdtree. Heading down the narrow path that winds around the base of the mountain will lead you directly toward the objective.
As you descend along the lower ledge, you will notice several glowing jellyfish floating near the pathway. These passive creatures indicate that you are following the correct route toward the cliffside overhang. Keep moving forward along this rocky track until you spot a creature scurrying nearby.
How to Obtain Sword Dance from the Teardrop Scarab
Unlike abilities acquired through chest loot or defeat of major bosses, Sword Dance is dropped by a specific Teardrop Scarab. The scarab rests along the central portion of the dirt path under a low stone archway. Because scarabs vanish quickly when approached, riders should charge in fast using Torrent to defeat it before it escapes.
A single well-timed mounted attack or quick ranged spell will defeat the scarab instantly. Once eliminated, the Ash of War: Sword Dance is immediately added to your inventory. If the scarab happens to burrow into the ground and disappear, simply rest at the nearest Site of Grace to reset its position.
Combat Mechanics and Weapon Compatibility
Sword Dance provides the Keen affinity by default, making it an excellent choice for Dexterity-focused builds. When activated, your character rapidly closes the distance to perform a pair of upward spinning strikes. Pressing the skill button a second time follows up with a heavy downward slash to break enemy guards.
This skill can be applied to a wide selection of armament types, including standard swords, axes, and slashing polearms. However, colossal weapons and great spears are excluded from equipping this maneuver due to weight limitations. Incorporating this skill into your arsenal offers reliable range control and rapid physical damage output during tight combat scenarios.
How To Game Share PS4 With Another PlayStation...
Game sharing on the PlayStation 4 allows two players to pool their digital game libraries and share PlayStation Plus benefits easily. By adjusting primary console settings, family members or close friends can enjoy each other's purchased titles without paying twice. Setting up this feature requires only a few minutes and a basic understanding of account management mechanics.
Understanding the Primary Console Mechanism
Every PlayStation Network account can designate one PS4 system as its primary console. When an account sets a console as primary, any other user on that device gains access to its downloaded digital games and active online multiplayer subscriptions. This feature forms the technical backbone of game sharing across two separate accounts.
To begin sharing, you must exchange login details securely with a trusted friend or family member. Logging into your account on your friend's console allows them to set their machine as your primary system. Conversely, doing the same on your own console gives you access to their complete digital catalogue.
Step-by-Step Guide to Setting Up Game Sharing
Start by creating a new user profile on your friend's PS4 and log in using your PlayStation Network credentials. Navigate to the Settings menu, select Account Management, and click on Activate as Your Primary PS4. Select Activate to finalize the connection and enable access for all local accounts on that console.
After activating the console, open the Library menu under your profile to view your full collection of purchased titles. Initiate the download for any games your friend wishes to play onto their hard drive storage. Once the downloads begin, you can log out of your profile while the background installation completes safely.
Accessing Shared Digital Content and Subscriptions
Your friend can now return to their personal user profile and launch any of the newly installed games. Shared benefits extend beyond digital game downloads to include PlayStation Plus online multiplayer capabilities. However, cloud storage saves and direct trophy synchronization remain tied exclusively to the original purchasing account.
On your own console, you will still retain full access to your game library as long as you maintain an active internet connection. Online verification allows Sony servers to validate your digital licenses while playing on a non-primary machine. This setup guarantees that both users can play simultaneously without technical conflicts.
Important Account Safety and Limitations
While game sharing is a convenient feature, sharing credentials carries inherent security risks if done with untrusted individuals. Never share your password with strangers or public groups to prevent account theft and unauthorized transactions. Utilizing two-factor authentication adds an essential layer of defense against potential compromise.
Keep in mind that Sony limits primary console activations to one system per account at any given time. If you experience technical issues, primary designations can be managed through the official PlayStation account portal online. Understanding these limitations ensures a smooth and secure gaming experience for both participants.

How To Game Share PS4 With Another PlayStation...
Game sharing on the PlayStation 4 allows two players to pool their digital game libraries and share PlayStation Plus benefits easily. By adjusting primary console settings, family members or close friends can enjoy each other's purchased titles without paying twice. Setting up this feature requires only a few minutes and a basic understanding of account management mechanics.
Understanding the Primary Console Mechanism
Every PlayStation Network account can designate one PS4 system as its primary console. When an account sets a console as primary, any other user on that device gains access to its downloaded digital games and active online multiplayer subscriptions. This feature forms the technical backbone of game sharing across two separate accounts.
To begin sharing, you must exchange login details securely with a trusted friend or family member. Logging into your account on your friend's console allows them to set their machine as your primary system. Conversely, doing the same on your own console gives you access to their complete digital catalogue.
Step-by-Step Guide to Setting Up Game Sharing
Start by creating a new user profile on your friend's PS4 and log in using your PlayStation Network credentials. Navigate to the Settings menu, select Account Management, and click on Activate as Your Primary PS4. Select Activate to finalize the connection and enable access for all local accounts on that console.
After activating the console, open the Library menu under your profile to view your full collection of purchased titles. Initiate the download for any games your friend wishes to play onto their hard drive storage. Once the downloads begin, you can log out of your profile while the background installation completes safely.
Accessing Shared Digital Content and Subscriptions
Your friend can now return to their personal user profile and launch any of the newly installed games. Shared benefits extend beyond digital game downloads to include PlayStation Plus online multiplayer capabilities. However, cloud storage saves and direct trophy synchronization remain tied exclusively to the original purchasing account.
On your own console, you will still retain full access to your game library as long as you maintain an active internet connection. Online verification allows Sony servers to validate your digital licenses while playing on a non-primary machine. This setup guarantees that both users can play simultaneously without technical conflicts.
Important Account Safety and Limitations
While game sharing is a convenient feature, sharing credentials carries inherent security risks if done with untrusted individuals. Never share your password with strangers or public groups to prevent account theft and unauthorized transactions. Utilizing two-factor authentication adds an essential layer of defense against potential compromise.
Keep in mind that Sony limits primary console activations to one system per account at any given time. If you experience technical issues, primary designations can be managed through the official PlayStation account portal online. Understanding these limitations ensures a smooth and secure gaming experience for both participants.

Cyberpunk 2077 Where To Find Skippy Location And...
Cyberpunk 2077 offers a vast array of unique gear, but few weapons stand out quite like Skippy. This Smart Pistol comes equipped with its own talkative artificial intelligence, offering witty commentary and powerful auto-targeting mechanics. Finding Skippy provides players with both an entertaining companion and a scaleable firearm that remains effective throughout their journey across Night City.
Exact Map Location for Skippy in Night City
To acquire Skippy, players must head directly to the Vista Del Rey district located within Heywood. Fast traveling to the College Street station provides the quickest access point to the weapon's location. From the travel point, navigate toward an alleyway marked by an unnumbered side quest icon on your minimap.
Upon reaching the alleyway, players will need to vault over a set of cardboard boxes and a chain-link fence. Inside, an open briefcase sits beside a deceased individual, housing the iconic firearm. Interacting with the weapon triggers an initial dialogue sequence where Skippy introduces himself.
Understanding Skippy's Core Weapon Mechanics
Skippy is a variant of the HJKE-AA Yukimura Smart Pistol that automatically scales its stats according to your character level. Because of this scaling feature, the weapon never truly becomes obsolete as you progress through difficult missions. Operating it requires Smart Link cyberware installed at a Ripperdoc to fully utilize its automated targeting capabilities.
When first activated, Skippy prompts you to select between two firing configurations: Stone-Cold Killer or Puppy-Loving Pacifist. Stone-Cold Killer forces all shots to target headshots exclusively, while Puppy-Loving Pacifist targets the lower extremities. However, this choice comes with a permanent twist after securing 50 incapacitations or kills.
Navigating the Firing Mode Trap
After reaching 50 total kills or downs, Skippy's AI system will automatically switch to the opposite mode permanently. If you desire permanent headshot auto-targeting, you must select Puppy-Loving Pacifist during the initial conversation. Players seeking thorough gear advice can check for comprehensive strategies across various titles.
Once the mode automatically switches, Skippy will permanently lock into your preferred firing style for the rest of your playthrough. Ignoring or attempting to bypass this dialogue choice will prevent the weapon from permanently locking into the desired state. Understanding this trick ensures you maximize the pistol's combat potential during endgame activities.
Returning Skippy and Quest Progression
Eventually, carrying Skippy long enough unlocks a side mission titled "Machine Gun" where the AI remembers its original owner, Regina Jones. Players face a choice between returning the gun for a cash reward or keeping the firearm in their personal inventory. Refusing to return the pistol results in Skippy voicing constant disapproval, though the weapon remains fully functional.
Alternatively, delivering the weapon back to Regina completes the quest clean from your log. Choosing how to handle Skippy ultimately depends on whether you prioritize quest completion or keeping a quirky smart weapon. Regardless of your choice, obtaining Skippy remains one of the most memorable side encounters in Cyberpunk 2077.

Do Gameboy Advance Games Have Batteries And How...
The Game Boy Advance era marked a significant turning point in how portable video games handled save data. Retro gamers often wonder if their physical GBA cartridges contain internal batteries that will eventually dry up and cause save files to disappear. Understanding how save storage functions on this classic handheld helps collectors preserve their favourite gaming memories.
Do Game Boy Advance Games Have Save Batteries?
Unlike original Game Boy and Game Boy Color games which almost universally relied on battery-backed SRAM, most Game Boy Advance titles do not use batteries to retain save files. Nintendo transitioned to modern, non-volatile memory chips that can hold information indefinitely without continuous electrical power. However, a small select group of early GBA releases still featured traditional batteries for saving.
Additionally, several popular cartridges incorporate internal coin-cell batteries strictly to power real-time clock functions rather than holding save data. Titles like the main Pokemon RPG series use a CR1616 battery to keep track of daily events and berry growth. When these batteries run dry, the save file itself remains completely intact, though time-based features in the game will stop advancing.
The Primary Types of GBA Save Memory
Game Boy Advance cartridges generally utilize four distinct types of save storage technologies inside the physical casing. These categories consist of SRAM, EEPROM, Flash memory, and FRAM chips. EEPROM and Flash memory represent the vast majority of the library and offer stable, long-lasting storage without needing an internal power source.
SRAM memory requires a continuous trickle of power from a battery, meaning those specific cartridges will lose data once the battery fails. On the other hand, FRAM acts similarly to SRAM but uses ferroelectric properties to preserve files without any battery assistance. Learning about these technologies gives players clear insight into how long their retro collections will reliably preserve game progress.
Replacing Batteries and Maintaining Cartridges
For cartridges that require an internal battery replacement for clock features or SRAM storage, the restoration process is straightforward. Opening a GBA Game Pak requires a specialized tri-wing screwdriver to remove the back casing safely. Replacing the old CR1616 coin cell typically involves carefully desoldering the original tabs attached to the printed circuit board.
If you prefer a software-based approach, you can learn how save data works on modern hardware tools to back up files before performing physical repairs. Regular maintenance and careful storage away from extreme temperatures ensure that electronic components remain functional for decades. Preserving your physical media guarantees that classic portable adventures remain fully playable for future generations.

Casino Night Party Near Me and How to...
Attending a casino night party offers a unique blend of social entertainment, strategic gaming, and vibrant nightlife without requiring a trip to a major gambling hub. Across many communities, charitable organizations, social clubs, and venue halls host these themed gatherings to bring people together for a memorable evening. Finding these local gatherings requires knowing where to search and understanding how these events are organized in your area.
Understanding How Local Casino Night Parties Work
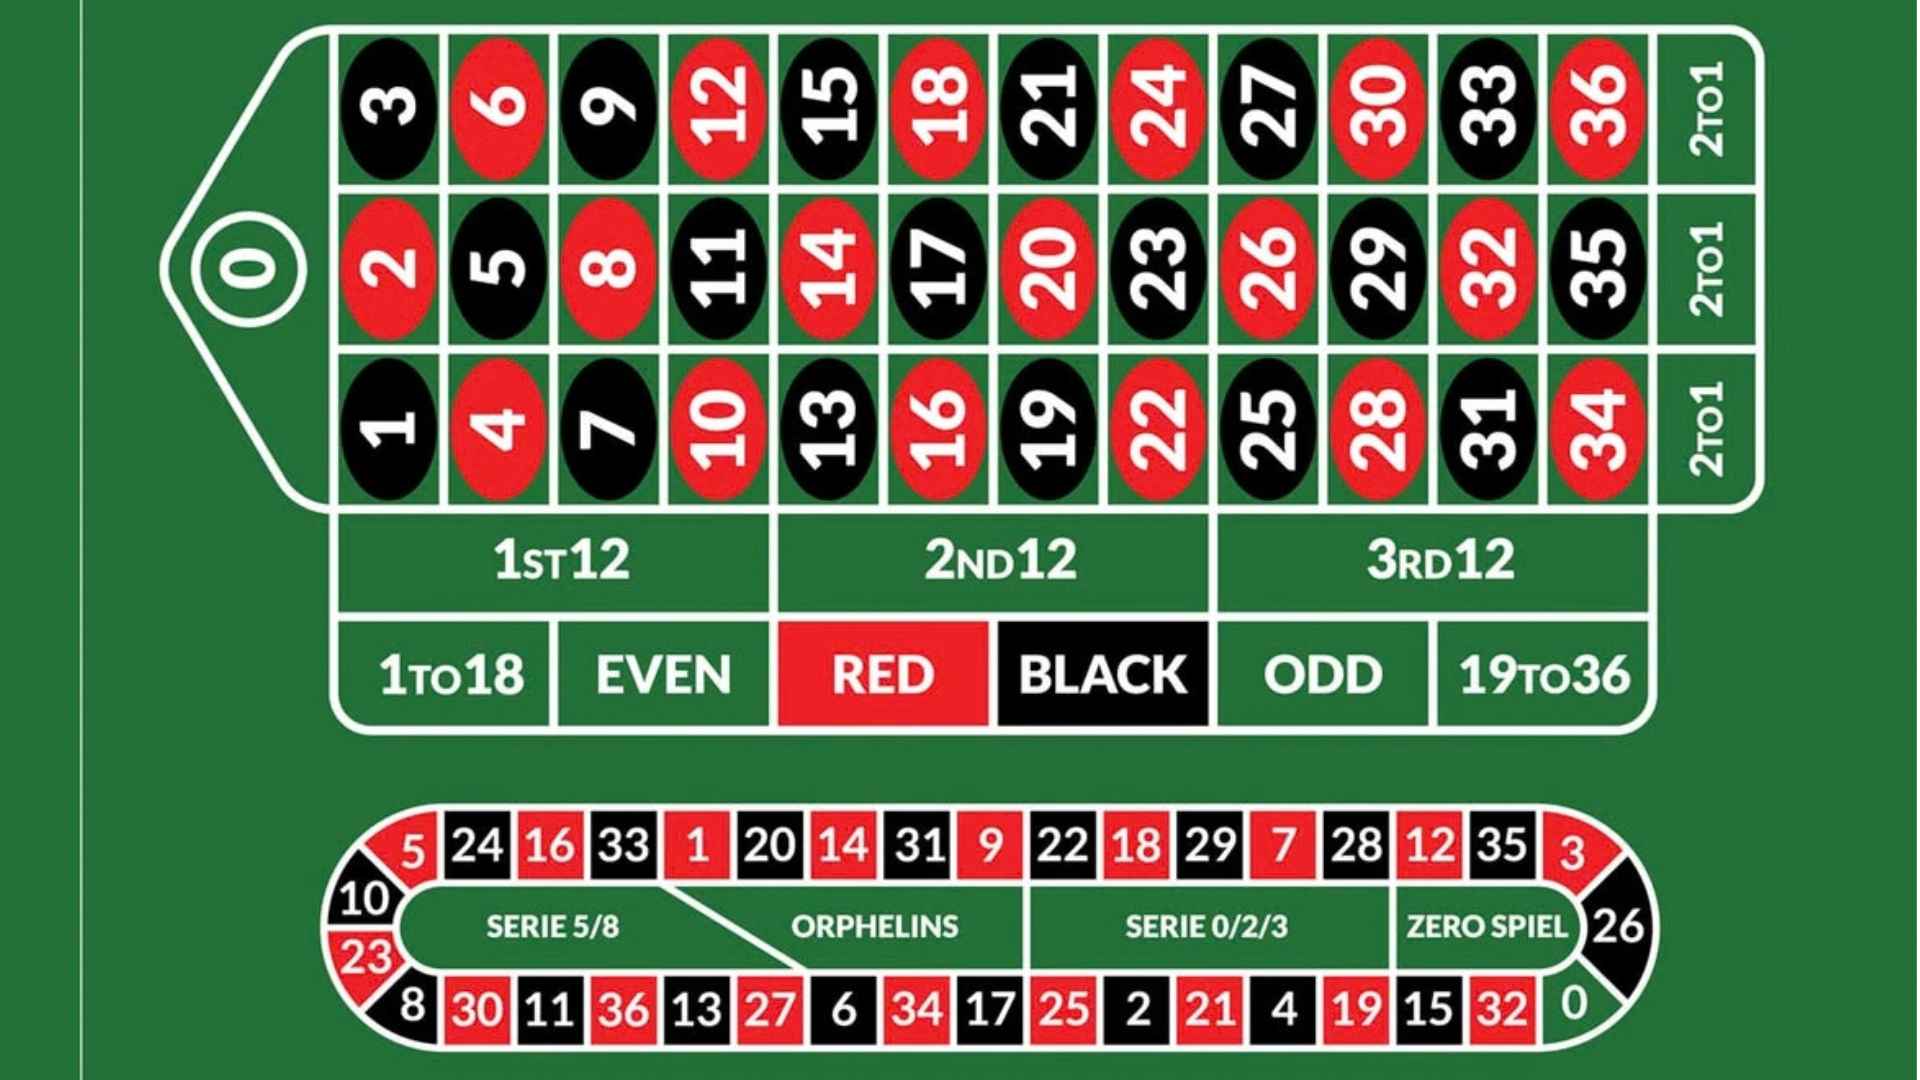
Most local casino night events operate using play money or chips rather than real cash stakes to comply with regional social gaming laws. Guests usually purchase an entry ticket that includes a starting stack of chips, which can be played at classic tables like blackjack, roulette, and poker. At the end of the night, players often exchange their accumulated chips for raffle tickets or prize entries.
These gatherings are especially popular for charity fundraisers, corporate celebrations, and community social galas. Because the focus remains on entertainment and fundraising, the environment is typically welcoming to both experienced players and complete novices. Friendly dealers are often on hand to explain basic rules and guide participants through the games.
Effective Ways to Locate Casino Events Nearby
Digital event directories and local community calendars are often the best starting points when searching for upcoming casino nights. Community centers, local newspapers, and civic organization websites frequently post event notices months in advance. Social media event pages and neighborhood forums also serve as great hubs for finding pop-up gaming nights hosted by local businesses.
In addition to physical venues, enthusiasts often explore online platforms such as m88 to understand game dynamics and rules before attending live interactive events. Following regional charity groups and community foundations on social media ensures you receive timely notifications when ticket sales open. Many of these gatherings sell out quickly due to limited venue capacities.
What to Expect When Attending a Themed Casino Night
Attending a casino night usually involves a specific dress code, ranging from smart casual to formal evening wear depending on the venue. Upon arrival, guests check in to receive their access passes and initial vouchers for gaming chips. Many events also feature live music, catered food options, and silent auctions alongside the gaming tables.
It is helpful to arrive early to familiarize yourself with the layout and secure a spot at your preferred tables. Since these events prioritize social interaction, switching tables throughout the evening allows you to meet different guests and enjoy various games. Understanding the event schedule helps ensure you do not miss final chip turn-ins or prize drawings.
Tips for Getting the Most Out of Your Experience
To maximize your enjoyment, treat the evening primarily as a social event rather than an intense competition. Take time to learn the basic flow of games you have never tried before, as dealers are usually happy to help during casual rounds. Pacing your chip usage throughout the night ensures you stay engaged until the final raffle or auction.
Supporting the hosting organization by purchasing extra raffle entries or participating in secondary auctions adds to the overall success of the event. Gathering a group of friends to attend together often makes the experience even more rewarding. With a little research into local listings, finding a thrilling casino night nearby is straightforward and fun.

Best Radiant Spells Lords Of The Fallen Guide
Radiant magic in Lords of the Fallen offers players a versatile blend of holy offensive power, supportive healing, and substantial defensive buffs. Harnessing these divine incantations can drastically change how you approach challenging boss encounters and exploration throughout Mournstead. Mastering the optimal setup ensures your character stays resilient while punishing enemies from a distance.
Top Offensive Radiant Spells for High Damage
When looking to strike down foes with holy energy, Radiant Flare serves as a reliable early option due to its fast cast time and low Mana cost. As you progress deeper into the game, spells like Piercing Light and Lucent Beam become central to dealing massive single-target and area-of-effect damage. Equipping these spells allows holy casters to manage large hordes without putting themselves in immediate physical danger.
For heavy damage against elites and bosses, Blessed Reflections summons spectral guardians to strike targets repeatedly. Pairing this with high Radiance scaling catalysts maximizes your total damage output during long fights. Managing your Mana consumption becomes vital when using these higher-tier incantations consistently.
Essential Support and Healing Magic
Radiant builds excel at keeping players alive during extended journeys between vestiges. Spells like Radiant Healing and Invigorating Aura provide continuous health recovery that reduces reliance on limited Sanguinarix charges. These abilities allow adventurers to survive tough gauntlets and recover quickly after taking heavy hits.
In addition to active healing, utility incantations offer clean status removal to counteract dangerous build-ups such as poison or bleed. Keeping a basic restorative spell active on your shortcut wheel ensures you can react quickly during hazardous environmental encounters. Utilizing defensive buffs significantly lowers incoming physical and elemental damage from dangerous targets.
Weapon Augmentations and Defensive Buffs
Enhancing your physical weapons with holy energy is another cornerstone of effective Radiance builds. Casting Radiant Weapon coats your current armament in holy light, granting substantial bonus damage that scales with your primary spellcasting stat. This creates a powerful hybrid playstyle that excels in close-quarters combat.
Defensive incantations like Aura of Tenacity provide flat damage reduction, giving players extra leeway when dodging complex boss attack patterns. Combining weapon buffs with protective barriers creates a balanced character capable of trading blows with formidable bosses. Players seeking deeper build ideas can check out a detailed breakdown of Radiant Spells Lords of the Fallen strategy guides available online.
Optimizing Your Catalyst and Stat Distribution
To maximize the potency of your spells, investing heavily in the Radiance stat is necessary to hit primary soft caps. Equipping specialized catalysts like the Exacter Scripture or Wilmarc's Catalyst ensures your spells deal maximum damage while reducing overall casting delays. Equipping rings and pendants that boost Mana regeneration further streamlines your spellcasting rotation.
Balancing your Mana capacity alongside your Health pool ensures you remain effective without becoming overly fragile. Utilizing socketed runes on your weapons can also boost spell power or lower the Mana costs of specific incantations. With proper stat distribution and catalyst upgrades, your holy caster will easily overcome the darkest threats in the game.

How To Reset PS5 Remote Controller Reset And...
Experiencing input lag, connectivity drops, or responsiveness issues with your PlayStation 5 DualSense controller can quickly disrupt an immersive gaming session. Performing a full hardware reset is often the most effective method to clear temporary glitch data and restore factory performance. Understanding the proper steps to reset and re-pair your gamepad ensures a seamless connection with your console.
Locate and Trigger the Hard Reset Pin-Hole
Before initiating a reset, turn off your PlayStation 5 console completely to prevent signal interference. Turn your DualSense controller over to inspect the rear casing near the Sony logo. You will find a small, recessed reset hole situated right next to the microphone icon.
Insert a straightened paperclip or SIM ejection tool straight into the hole until you feel a small internal button depress. Hold this button down firmly for at least five seconds to clear all saved Bluetooth profile configurations from the device. Release the button and allow the controller to power down completely before attempting any new connection.
Re-Pairing the Controller via USB Connection
Once the memory reset is finished, grab the official USB-C cable that came packaged with your console. Plug one end directly into the front USB port of the PS5 and connect the other end to your controller. Turn on your PS5 console using the physical power button located on the front panel.
Press the central PS button on your gamepad once the console boots up to the main dashboard menu. The light bar on the controller will flash briefly before glowing a solid blue, indicating a successful pairing. You can now safely unplug the USB cable and continue playing wirelessly without connection hiccups.
Alternative Wireless Pairing Mode Setup
If you prefer to pair your controller without using a cable, you can activate the manual Bluetooth pairing mode. Ensure your console is turned on and navigate to the Bluetooth Accessories menu using a second input device or media remote. Turn off the controller you wish to pair before starting the wireless sync process.
Press and hold the Create button and the PS button simultaneously for several seconds until the light bar begins double-blinking. Select the controller from the list of available accessories shown on your television screen. The light bar will turn solid to confirm that wireless registration is complete.
Troubleshooting Persistent Connection Drops
If your DualSense controller continues to disconnect after performing a reset, check for potential signal interference around your entertainment center. External hard drives, Wi-Fi routers, and cordless phones placed too close to the console can disrupt the Bluetooth signal. Updating your controller firmware through the PS5 system settings menu can also resolve underlying stability bugs.
Hardware wear or a dying internal battery can also cause unexpected power loss during active gameplay. Testing the controller with a secondary console or PC helps determine whether the issue stems from the gamepad or the PS5 system itself. Regular maintenance and proper storage will extend the lifespan of your controller components.

Sainted Hero Grave Elden Ring Location And Complete...
Sainted Hero's Grave is one of the most intriguing optional dungeons in Elden Ring, situated in the central region of the Altus Plateau. Navigating this subterranean tomb requires more than just high stats, as players must overcome unique light-based puzzle mechanics to defeat invulnerable shadow foes. Mastering this dungeon yields valuable Spirit Ashes, powerful crafting items, and access to a memorable boss battle.
How to Find Sainted Hero Grave in Altus Plateau
To reach Sainted Hero's Grave, players should travel west from the Rampartside Path Site of Grace or north from the Altus Highway Junction in the Altus Plateau. The entrance is guarded by a formidable Black Knife Assassin who spawns directly outside the stone doors. You can choose to engage this opponent for early rewards or bypass the encounter entirely by slipping past into the dungeon entrance.
Once inside, activate the Site of Grace to set a safe respawn point before descending into the tomb's depths. Taking a moment to organize your light sources and defensive gear will make the upcoming navigation far easier.
Navigating the Shadow Mechanics and Light Circles
The core gimmick of Sainted Hero's Grave involves shadow enemies that remain completely immune to all physical and magical attacks while standing in darkness. To harm these phantom guardians, players must lure them into glowing circles of light projected onto the floor by holy lanterns. Luring enemies strategically allows your attacks to register normally, turning tough confrontations into manageable fights.
As you progress through the corridors, pay close attention to environmental cues and floor pressure plates that trigger falling blade traps. Utilizing these traps strategically can also deal heavy damage to patrolling shadows without risking close-quarters combat.
Key Loot and Hidden Areas to Uncover
Exploring every side passage within Sainted Hero's Grave rewards diligent Tarnished with rare upgrade materials and unique equipment. Among the primary treasures hidden within the tomb are Grave Glovewort plants, which are vital for upgrading legendary spirit summon companions. You can also discover specialized Spirit Ashes tucked away behind imp statue fog gates requiring Stonesword Keys.
Be sure to thoroughly inspect subterranean balconies and drop-down paths to collect all available loot. Taking the extra time to explore every alcove ensures you do not miss any valuable talismans or weapon upgrades.
Defeating the Ancient Hero of Zamor Boss
At the lowest level of the dungeon lies the boss chamber containing the Ancient Hero of Zamor. This agile adversary utilizes frost-based elemental attacks, sweeping ice slashes, and rapid mobility to test your evasion timing. Equipping armor with high frost resistance and utilizing fire-based incantations or weapons can deal significant damage to this icy warrior.
Maintaining a safe distance during the boss's second phase is critical, as its frost AOE attacks become far more frequent and dangerous. Defeating the Ancient Hero of Zamor completes the dungeon, rewarding players with its powerful Spirit Ashes and a substantial sum of runes.

Final Fantasy VII Rebirth Parade Formation Character Setup...
The Junon Parade in Final Fantasy VII Rebirth offers players one of the most memorable gameplay sequences in the game. Beyond its cinematic appeal, achieving a high score during the performance requires careful planning and proper troop selection. Understanding how to organize your units into a cohesive formation ensures a seamless performance that impresses Rufus Shinra and unlocks top-tier rewards.
Understanding the Parade Mechanics and Scoring System
The Junon Parade challenge measures your performance based on rhythmic timing and team difficulty ratings. As Cloud leads the Seventh Infantry, players must hit timed button prompts while maintaining high performance momentum. Selecting harder formations increases the potential score multiplier, making strategic unit arrangements critical for optimal results.
Higher difficulty ratings demand quick reflexes, but they also grant significantly more commendations from the judges. Balancing your personal comfort with high-reward configurations allows you to maximize your score without risking costly mistakes during the mini-game.
Selecting the Best Unit Composition for High Difficulty
To achieve the maximum possible score, you must assemble the highest difficulty formation available in Junon. Gathering all ten Seventh Infantry infantry squads scattered throughout the city gives you total flexibility in building your lineup. Combining advanced units like the Grenadiers, Flametroopers, and Security Officers creates a three-star difficulty configuration.
Assigning matching unit types together unlocks powerful formation synergies that boost your overall score potential. Placing two Grenadier units alongside two Flametroopers ensures your squad reaches the highest performance rating possible. This specific arrangement provides the necessary challenge level to earn Rufus's Presidential Commendation.
Mastering the Performance Rhythm and Execution Strategy
Executing the parade sequence successfully relies heavily on understanding the visual cues for each button prompt. Red prompts require a single precise tap, while yellow prompts require rapid tapping to fill the meter. Blue prompts demand that you hold the button until the indicator reaches the end of the ring.
Staying relaxed and focusing on the shrinking target rings rather than the background dancers helps maintain accurate timing. Practicing the sequence beforehand allows you to memorize the rhythm changes across all three performance phases. Consistent accuracy across every phase guarantees a flawless score and secures the highest rewards.
Rewards for a Successful Junon Parade Performance
Securing a top score in the parade grants valuable story achievements and exclusive gameplay items. Players receive the Stearns Trophy along with deepened relationship bonds with key party members who witness the event. Additionally, achieving a high score influences the dialogue outcomes during subsequent story sequences in Junon.
Optimizing your squad formation before stepping onto the main stage remains the single most impactful factor in your success. Taking the extra time to recruit all hidden infantry units ensures you have the exact squad setup needed for a victory.

Princess Peach Showtime All Outfits Complete Outfit Guide
Princess Peach Showtime offers players an exciting adventure where transformations play a central role in overcoming theatrical challenges. Throughout the Sparkle Theater, Peach can don ten distinct main outfits that completely alter her abilities and gameplay style. Understanding how each outfit works helps players master every stage and collect all hidden items efficiently.
Action and Combat Transformations
Combat-focused costumes allow Peach to tackle groups of enemies with unique martial techniques. Swordfighter Peach delivers swift blade slashes and counterattacks, while Kung Fu Peach uses agile kicks and aerial acrobatic moves to overpower foes. Additionally, Mighty Peach transforms her into a powerful superhero capable of lifting heavy objects and punching through obstacles.
Stealth and ranged options offer strategic approaches to tricky theatrical scenarios. Ninja Peach utilizes props to hide in the environment and strikes swiftly with kunai weapons. Meanwhile, Cowgirl Peach uses her lasso to wrangle enemies and ride horses across fast-paced stages.
Investigative and Utility Outfits
Certain transformations focus on puzzle solving and environmental interaction rather than direct combat. Detective Peach dons a sleuthing cap to interrogate locals and discover hidden clues across mystery stages. Dashing Thief Peach relies on high-tech gadgets to sneak past security systems and infiltrate guarded areas.
Other utility forms leverage grace and creativity to solve unique stage puzzles. Patissiere Peach bakes and decorates elaborate desserts to satisfy hungry theater patrons. Figure Skater Peach glides gracefully across ice rinks to perform elegant spins and defeat enemies on thin ice.
Elemental and Customization Styles
Mermaid Peach brings musical flair to underwater stages by controlling marine life with her singing voice. This transformation allows her to guide schools of fish to trigger switches and clear aquatic pathways. Mastering her unique rhythm sequences is essential for reaching complete stage performance scores.
Beyond the core transformations, players can unlock decorative dress patterns and Stella ribbons by finding the Ribboner in various levels. Collecting Sparkle Gems and completing post-game challenges opens up additional cosmetic options in the theater shop. Exploring every corner ensures that Peach looks her absolute best throughout her grand performance.

Double Bladed Lightsaber Fallen Order How To Unlock...
In Star Wars Jedi: Fallen Order, acquiring the double-bladed lightsaber is a game-changing moment for combat. This versatile weapon modification provides sweeping area-of-effect attacks and exceptional defensive capabilities against multiple opponents. Players looking to expand Cal Kestis's combat options can discover this essential upgrade through several unique exploration paths.
Early Unlocks on Dathomir and Bogano
The fastest route to obtaining the double-bladed lightsaber is by traveling directly to Dathomir early in the story. Players can brave hostile Nightbrothers to reach a specific workbench located in Brother's Bastion. Alternatively, players who prefer a safer progression route can return to Bogano's Abandoned Workshop after obtaining Force Push and the Scomp Link on Zeffo.
Story Progression and Unmissable Workbenches
For players who miss early opportunities, the game provides additional natural touchpoints during the story. Reaching the Origin Lake area during your second visit to Kashyyyk features an unmissable workbench containing the double-blade modification. This safety mechanic ensures every player gains access to the iconic staff-style saber before facing late-game combat challenges.
Customizing and Upgrading the Weapon
Upgrading your lightsaber goes beyond unlocking the dual-blade attachment, as customization plays a big role in personalizing your experience. Players can collect unique emitters, switches, and sleeves hidden across various planets to tailor the hilt's visual appearance. Later in the campaign, visiting the ice planet Ilum unlocks full Kyber crystal color customization for complete aesthetic control.
Combat Strategies and Best Usage
While the single blade excels at focused single-target damage against tough bosses, the double-bladed lightsaber shines during large group encounters. It allows Cal to deflect a continuous barrage of enemy blaster fire back at multiple stormtroopers simultaneously. Combining both combat stances dynamically creates a balanced and fluid combat system throughout the galaxy.

Disney Dreamlight Valley My Hero Cookie Quest And...
Preparing a "My Hero" Cookie in Disney Dreamlight Valley is a key culinary task required during special character story lines, including quests involving Vanellope and Wreck-It Ralph. Players often need to bake this specific treat to advance story objectives and unlock iconic Disney companions. Understanding the exact ingredients and steps ensures you avoid common cooking mistakes and keep your valley progression smooth.
Gathering the Correct Ingredients for the Recipe
To craft a "My Hero" Cookie, you must gather three specific ingredients: one portion of Wheat, one portion of Butter, and any Sweet item. Wheat can be easily grown from seeds or purchased directly from Goofy's stall in the Peaceful Meadow. Butter must be bought from Chez Remy's pantry stock once his restaurant is open.
Choosing the correct sweet ingredient is crucial, as using certain items like sugarcane can accidentally result in a completely different dish like biscuits or crepes. Vanilla or cocoa beans are the most reliable options to guarantee a successful bake. Double-checking your pantry before heading to the cooking station saves valuable resources.
Baking the Cookie in Chez Remy's Kitchen
Once you have gathered Wheat, Butter, and Vanilla in your inventory, head to any cooking station or Chez Remy's restaurant. Throw one unit of each ingredient into the pot and spend one Coal Ore to cook the item. The resulting two-star dessert will immediately transfer into your inventory ready for the quest objective.
If you encounter issues during cooking, verify that you are not adding extra ingredients that alter the recipe outcome. Keep the recipe stored in your collection log for future village requests or daily character gifts. Efficient cooking habits help keep your energy levels topped off while exploring.
Delivering the Cookie and Quest Progress
After baking the item, check your active quest log to ensure the requirement updates properly. Take the freshly baked treat directly to the target character inside their house or around the valley. Handing over the dish triggers the next cutscene or dialogue needed to solve the story conflict.
Completing this objective brings you closer to fully welcoming characters like Ralph into your village roster. Resolving these quests deepens your friendship levels, opening up additional character abilities and decorative rewards. Finishing these narrative steps ensures your valley continues to grow and thrive.
Unlocking Rewards and Character Milestones
Handing over the required dish rewards players with increased friendship experience points for the involved characters. Advancing through these quests unlocks unique furniture items, clothing pieces, and house customization options. Furthermore, bringing iconic characters back to the village enriches the daily life simulation loop.
Mastering basic recipes prevents road blocks in future story updates and seasonal star path events. Keeping spare ingredients stored in chests allows you to complete emergency requests without extra grinding. Enjoying the fruits of your labor makes decorating and managing your valley even more satisfying.

How To Complete The Blood Stained Shrine And...
Exploring the expansive map of Iki Island in Ghost of Tsushima reveals several mysterious landmarks that test your observation skills. Among these, the Blood-Stained Shrine stands out as a unique homage to the dark fantasy world of Bloodborne. Players who uncover this location must decipher a cryptic poem and execute precise steps to claim exclusive cosmetic rewards.
Finding the Blood-Stained Shrine Location
The shrine is situated on the southwestern coast of Iki Island, specifically within the scenic region of Gonoura Cape. As you approach the coastal cliffs, look for a prominent stone statue surrounded by dark feathers and ambient crows. Resting near the front of the statue is a scroll containing the key riddle needed to proceed.
Equipping the Proper Gear and Taking Damage
To begin solving the puzzle, Jin Sakai must equip the Kensei Armor, which is earned by completing The Six Blades of Kojiro Mythic Tale. Once the armor is equipped, the riddle hints that you must reject death's allure by restoring health in front of the shrine. If Jin is already at full health, take fall damage by leaping off a nearby rock formation.
Activating the Healing Sequence for Rewards
After taking damage, stand directly before the shrine statue and trigger your normal healing command. Using Resolve to heal while wearing the Kensei Armor immediately initiates a brief cutscene confirming the puzzle is solved. Completing this hidden challenge rewards players with the iconic Yharnam Helm and Yharnam Vestments armor dye.
Troubleshooting Common Puzzle Activation Issues
If the shrine fails to react, double-check your current equipment to ensure the Kensei Armor is selected in the menu. Additionally, make sure Jin has actually lost health so that the healing action consumes Resolve. Following these exact requirements guarantees a seamless unlock without unnecessary backtracking.

How to Remove PS5 Panels: A Safe Guide...
Taking off the outer faceplates of your PlayStation 5 is an essential skill for routine maintenance, upgrading internal storage, or customizing the console's appearance. While the sleek design might seem daunting at first glance, Sony specifically engineered these plastic covers to pop off without requiring any specialized tools. Learning the proper technique ensures you can safely access the internal expansion slot and fan vents without damaging the delicate plastic latches.
Preparing Your Console and Workspace
Before attempting to disassemble any part of your console, completely turn off the system and unplug all connected cables. Place the device on a flat, clean surface covered with a microfiber towel to prevent scratching the outer casing during the process. Allowing the hardware to cool down completely helps make the plastic elements more flexible and easier to handle safely.
Positioning the console correctly is the most critical step for effortless panel removal. Lay the PS5 flat with the iconic PlayStation logo facing upward and the rear power ports pointed toward your body. This specific orientation gives you optimal leverage to apply gentle upward pressure on the correct corner of the shell.
Removing the Top Faceplate Safely
Grasp the top-left corner of the faceplate where the small PlayStation logo is located and lift it slightly upward away from the console body. While maintaining this slight upward lift, use your other hand to push the entire panel toward the bottom base of the unit. The cover should slide off smoothly with a gentle pop as the retaining hooks release from their internal grooves.
Avoid using excessive force or sharp leverage tools, as applying too much pressure can snap the delicate plastic pegs hidden underneath. If the panel feels stuck, re-align your hands and ensure you are lifting the corner slightly before pushing downward. Patience ensures the outer casing remains pristine and undamaged.
Detaching the Bottom Faceplate
Flip the console over so the side with the disc drive slot or bottom surface is facing upward toward you. Position yourself so the rear ports are once again facing your body for consistent leverage. Grip the top corner opposite the disc slot, lift it slightly upward, and slide the panel toward the base of the console.
Just like the top cover, the bottom panel relies on the same sliding hook mechanism to stay locked in place. Once detached, you gain full visibility of the primary cooling fan assembly and the M.2 NVMe SSD expansion bay slot. Cleaning dust build-up from these exposed areas significantly improves overall airflow and system performance over time.
Reattaching the Covers Correctly
Putting the faceplates back onto the console requires aligning the internal hooks with the matching slots along the chassis. Position the cover slightly lower than its final resting place, then slide it upward toward the top edge of the hardware until you hear a clear snapping sound. This distinct click confirms that every locking hook has securely engaged.
Inspect all edges of the console to verify that the faceplates sit completely flush against the central black casing. Once both covers are firmly attached, reconnect your cables and power on the system to resume gaming. Practicing this simple technique makes routine console upkeep safe, fast, and stress-free.

How to Remove PS5 Panels: A Safe Guide...
Taking off the outer faceplates of your PlayStation 5 is an essential skill for routine maintenance, upgrading internal storage, or customizing the console's appearance. While the sleek design might seem daunting at first glance, Sony specifically engineered these plastic covers to pop off without requiring any specialized tools. Learning the proper technique ensures you can safely access the internal expansion slot and fan vents without damaging the delicate plastic latches.
Preparing Your Console and Workspace
Before attempting to disassemble any part of your console, completely turn off the system and unplug all connected cables. Place the device on a flat, clean surface covered with a microfiber towel to prevent scratching the outer casing during the process. Allowing the hardware to cool down completely helps make the plastic elements more flexible and easier to handle safely.
Positioning the console correctly is the most critical step for effortless panel removal. Lay the PS5 flat with the iconic PlayStation logo facing upward and the rear power ports pointed toward your body. This specific orientation gives you optimal leverage to apply gentle upward pressure on the correct corner of the shell.
Removing the Top Faceplate Safely
Grasp the top-left corner of the faceplate where the small PlayStation logo is located and lift it slightly upward away from the console body. While maintaining this slight upward lift, use your other hand to push the entire panel toward the bottom base of the unit. The cover should slide off smoothly with a gentle pop as the retaining hooks release from their internal grooves.
Avoid using excessive force or sharp leverage tools, as applying too much pressure can snap the delicate plastic pegs hidden underneath. If the panel feels stuck, re-align your hands and ensure you are lifting the corner slightly before pushing downward. Patience ensures the outer casing remains pristine and undamaged.
Detaching the Bottom Faceplate
Flip the console over so the side with the disc drive slot or bottom surface is facing upward toward you. Position yourself so the rear ports are once again facing your body for consistent leverage. Grip the top corner opposite the disc slot, lift it slightly upward, and slide the panel toward the base of the console.
Just like the top cover, the bottom panel relies on the same sliding hook mechanism to stay locked in place. Once detached, you gain full visibility of the primary cooling fan assembly and the M.2 NVMe SSD expansion bay slot. Cleaning dust build-up from these exposed areas significantly improves overall airflow and system performance over time.
Reattaching the Covers Correctly
Putting the faceplates back onto the console requires aligning the internal hooks with the matching slots along the chassis. Position the cover slightly lower than its final resting place, then slide it upward toward the top edge of the hardware until you hear a clear snapping sound. This distinct click confirms that every locking hook has securely engaged.
Inspect all edges of the console to verify that the faceplates sit completely flush against the central black casing. Once both covers are firmly attached, reconnect your cables and power on the system to resume gaming. Practicing this simple technique makes routine console upkeep safe, fast, and stress-free.

Best Armor Mass Effect 2: Top Armor Sets...
Equipping Commander Shepard with the right gear is essential for surviving the high-stakes missions of Mass Effect 2. Unlike its predecessor, Mass Effect 2 features a modular armor system along with full armor sets that grant distinct bonuses to suit different playstyles. Choosing the ideal armor loadout for your specific class can mean the difference between victory and defeat on higher difficulty settings.
Top Armor Options for Frontline Combat Classes
For weapon-focused classes like the Soldier and Vanguard, maximizing weapon output and defensive barriers is crucial during aggressive pushes. The Kestrel Armor set is widely considered the premier choice for combat builds because it provides massive boosts to weapon damage, shield capacity, and melee power. Vanguards especially benefit from the added shield durability and melee synergy when executing high-risk biotic charges into enemy lines.
Optimal Gear Choice for Biotic and Tech Specialists
Classes reliant on powers, such as Adepts, Engineers, and Sentinels, thrive when prioritizing power cooldowns and force amplification. The Inferno Armor stands out as a top-tier full set for power-heavy builds due to its direct boost to power damage and storm speed. Players can also mix modular pieces like the Amplifier Plates and Archon Visor to keep power recharge times minimal while increasing overall ability impact.
Precision Gear for Infiltrators and Long-Range Support
Infiltrators rely heavily on headshot precision and high burst damage from sniper rifles to eliminate key targets quickly. Equipping the Kuwashii Visor combined with weapon damage-boosting pieces like Stabilization Gauntlets allows snipers to land devastating critical hits. This setup ensures maximum damage per shot, making quick work of armored and shielded enemies from a safe distance.
Balancing Defense and Utility for Maximum Efficiency
While full armor sets offer convenient fixed bonuses, piece-by-piece customization often delivers superior targeted performance for specific roles. Mixing chest pieces like the Shield Harness or Capacitor Chestplate with mobility legs creates a well-rounded foundation for any class. Players who prefer flexible setups can refine their playstyle by looking into Best Armor Mass Effect 2: Top Armor Sets for Every Class to discover high-performing gear combinations.

Lies of P Path of the Pilgrim Ladder:...
Navigating through the eerie landscapes of Krat in Lies of P often leaves players puzzling over seemingly unreachable shortcuts and hidden items. One common area of confusion occurs along the Path of the Pilgrim, where an out-of-reach drop ladder and a locked shed tease observant travelers. Understanding how to access this spot requires patience, as the solution is tied to specific story progression rather than immediate exploration.
The Mystery of the Path of the Pilgrim Ladder
As players traverse the Path of the Pilgrim slums, they often spot a ladder resting on a high ledge near a wooden shed. Looking through the shed's window reveals a tempting treasure chest, yet there is no apparent door or path leading directly to it. Many players spend considerable time attempting to jump or find alternative routes, only to realize the path remains firmly blocked early in the game.
Advancing the Story to Unlock Access
Unlocking this tricky location requires players to continue their journey past Chapter 5 into Chapter 7. Upon reaching the Barren Swamp Bridge Stargazer, you will encounter a unique NPC standing near a gate. Speaking with this character allows you to receive an Old Cryptic Vessel, which serves as the ultimate key to solving this regional puzzle.
Decrypting the Cryptic Vessel
Once you obtain the cryptic item, travel back to Hotel Krat and present it to Venigni for decryption. After Venigni decodes the vessel, return directly to the slums along the Path of the Pilgrim. A new NPC will now be standing outside the locked shed, ready to engage in conversation and hand over the key.
Reaching the Hidden Chest and Ladder
Unlocking the shed door reveals a trap, causing the floor to give way beneath Pinocchio. After falling into the underground corridor, defeat the two carcass enemies waiting in the shadows. Follow the linear pathway upward across two ladders to finally reach the drop ladder, kicking it down to establish a permanent shortcut and claim your reward from the chest.

Elden Ring Ancestral Infants Head Location And How...
The Lands Between are filled with eerie and powerful tools, but few are as distinct as the Ancestral Infant's Head. This reusable item allows players to unleash area-of-effect magic damage without relying on traditional sorceries or incantations. Tracking down this unique artifact requires a trip deep into the underground regions of Limgrave, but the rewards are well worth the journey.
Where to Find the Ancestral Infant's Head in Elden Ring
To acquire this item, travelers must first gain access to Nokron, Eternal City, which opens after defeating Starscourge Radahn. Once inside the subterranean city, navigate toward the upper Siofra River section near the Ancestral Woods Site of Grace. From there, travel north across the rooftops and ruined structures until you reach a partially submerged building guarded by Ancestral Followers.
Carefully make your way through the ruined area while managing incoming ranged attacks from nearby enemies. At the back of these ruined structures, you will find a treasure chest resting at the end of a ledge. Opening this chest rewards you with the Ancestral Infant's Head, placing a potent tool directly into your inventory.
How to Use the Ancestral Infant's Head in Battle
When activated, the tool consumes Focus Points to spray a pool of blue spirit vapor in an arc directly in front of your character. This vapor lingers on the ground for several seconds, dealing continuous magic damage to any enemy that steps inside the cloud. It serves as an excellent crowd-control option when dealing with hordes of slow-moving foes or tight choke points.
Because the item scales primarily with Intelligence, sorcery-focused builds will get the highest damage output from its activation. Players can further boost the damage of the spectral geyser by equipping the Magic Scorpion Charm or the Shining Horned Headband. Incorporating this item into your quick-slot rotation provides a reliable ranged option when you need to conserve Memory Slots for other spells.
Best Situations for the Unique Tool
The lingering pool effect makes this item exceptional for controlling narrow corridors and doorway entrances during dungeon exploration. It is also highly effective against large bosses that remain stationary for extended periods, allowing the continuous magic ticks to pile up quickly. Additionally, PvP players can use the vapor cloud to deny area access or punish opponents trying to climb up ladders toward them.

Most Powerful Being In Marvel Universe Ranked And...
Exploring the vast hierarchy of Marvel Comics reveals an interconnected web of cosmic entities, reality warpers, and multidimensional gods that challenge our understanding of power. While famous heroes like Thor and the Hulk showcase incredible physical strength, they are vastly outmatched by the supreme beings that govern the stability of the multiverse. Understanding how these entities are ranked requires examining their foundational roles within the cosmic structure of creation.
The Supreme Creator of the Multiverse
At the absolute pinnacle of the Marvel cosmic hierarchy sits an ultimate, omnipotent entity known as The One Above All. This supreme being represents the creative forces of the writers and editors who shape the entire fictional landscape from beyond its boundaries. Because this deity possesses limitless authority, no other entity or weapon can ever surpass its ultimate rule over existence.
While other cosmic characters experience limits or occasional defeats, this absolute power remains completely unalterable across all narrative shifts. It serves as a narrative anchor, ensuring that there is always a singular source from which all multiversal realities originate. The entity rarely intervenes directly in mortal affairs, choosing instead to maintain the broader tapestry of life through various cosmic extensions.
The Ultimate Judge of Cosmic Law
Directly beneath the supreme creator is the Living Tribunal, a three-faced entity tasked with maintaining balance across infinite dimensions. This immense powerhouse acts as an impartial judge, preventing single universes from growing too powerful or collapsing into complete chaos. The three faces represents equity, necessity, and vengeance, which must agree unanimously before any major intervention occurs.
The authority of this cosmic judge transcends individual timelines, making its decisions absolute across the entire multiversal landscape. However, even this mighty protector has faced major challenges when dealing with threats originating from entirely separate realms of reality. Despite these rare cosmic disruptions, the entity remains the definitive legal authority for entities trying to exploit universal law.
The Primal Forces of Existence and Void
Beneath the institutional judges are the essential embodiments of reality itself, most notably represented by cosmic twins known as Eternity and Infinity. These entities literally encompass the physical space, time, and conceptual frameworks of the entire universe, viewing normal mortal conflicts as completely insignificant. Alongside them is Oblivion, a primordial force representing non-existence and the void that existed before the multiverse was even created.
These abstract constructs balance one another out, ensuring that creation and destruction remain in perfect alignment throughout history. When an individual universe undergoes a major transformation, these abstract forms shift their power levels to accommodate the changing universal landscape. Their roles help readers grasp the massive scale of Marvel cosmology, balancing traditional comic storytelling with deeper metaphysical ideas.
The Dangerous Outliers from Beyond
Beyond the traditional cosmic hierarchy lie unpredictable anomalies that completely disrupt the standard ranking systems of the multiverse. The Pre-Retcon Beyonder is a prime example of an extradimensional entity whose raw power scale completely dwarfed the combined forces of our universe. Originating from an isolated realm outside known space, this entity viewed the entire Marvel multiverse as a simple drop in an endless ocean.
Similarly, the enigmatic Beyonders operate completely outside the jurisdictions of local deities and standard cosmic laws. Their immense reality-warping capabilities allow them to systematically challenge or dismantle traditional cosmic hierarchies with terrifying ease. These beings remind comic book enthusiasts that the boundaries of power are constantly expanding, presenting fresh challenges for both heroes and cosmic protectors alike.

Skyrim Blood On The Ice Walkthrough And Complete...
Unraveling the darkest mysteries of Windhelm is one of the most immersive and chilling experiences in the snowy province of Skyrim. The infamous quest known as Blood on the Ice tasks players with tracking down an elusive serial killer terrorizing the local populace. Navigating the cold alleys of the city to solve these horrific crimes requires a keen eye for hidden details and careful dialogue management to avoid sudden dead ends.
Investigating the Windhelm Crime Scene
Triggering this complex murder mystery requires visiting the Windhelm graveyard specifically between the hours of 7 PM and 7 AM. Upon arrival, you will find a small crowd gathered around a fresh victim, prompting an immediate investigation into the local tragedy. Speaking with the guarding guard allows you to secure special permission from the Jarl's steward to fully investigate the area.
Following the trail of blood leads directly to Hjerim, an abandoned manor that hides the dark secrets of the killer. Before entering the home, you must secure the key by speaking with Tova Shatter-Shield or using expert lockpicking skills on the front entrance. Thoroughly examining the eerie interior reveals hidden compartments, unusual journals, and a strange mystical amulet buried beneath old flyers.
Following the Clues and Selling the Amulet
Once you gather the evidence from the abandoned estate, you must consult with local experts who understand the history of Windhelm. Calixto Corrium, the curator of the local house of curiosities, offers valuable insights regarding the strange jewelry found in the manor. He will offer to purchase the item from you, which is highly recommended to prevent the artifact from becoming permanently glitched in your inventory.
To ensure you follow the correct path, you can check your active objectives or reference a comprehensive Software platform for technical troubleshooting if scripts fail to advance. After dealing with the artifact, bringing the journals to Viola Giordano will reveal critical connections regarding the butcher's true identity. Together, you will form a plan to confront the primary suspect before another life is taken in the shadows.
Catching the True Butcher of Windhelm
Many players accidentally finish this mystery early by accusing the court mage, Wuunferth the Unliving, which results in an incorrect arrest. To avoid this common narrative trap, confront the mage directly in the palace to learn about his innocent relationship with necromancy. He will reveal that the true killer strikes primarily at night, directing you to patrol the Stone Quarter marketplace after darkness falls.
Stalking the cold marketplace allows you to witness the killer preparing to strike another innocent citizen near the stalls. Intervening quickly saves the victim and forces the true culprit to flee back toward the safety of the abandoned manor. Cornering the murderer inside the blood-stained halls of Hjerim and defeating them permanently brings long-awaited justice to the grieving people of Windhelm.

Crystal Peak Map Hollow Knight Complete Location Guide
Navigating the glittering yet treacherous caverns of Hallownest requires a keen eye and a solid strategy, especially when venturing into the industrial upper reaches. The Crystal Peak Map Hollow Knight Complete Location Guide is designed to help adventurers secure their bearings in this resource-rich but hazard-filled zone. Finding the local cartographer early in your exploration mitigates the risk of becoming hopelessly lost among the crushing machinery and spikes.
Finding Cornifer in the Crystal Mines
Locating the friendly mapmaker should be your primary objective upon arriving in this pink-hued industrial zone. Cornifer can be heard humming near the upper-left section of the main vertical shaft, tucked away safely from active mining threats. Purchasing the initial chart from him gives you an immediate blueprint of the surrounding corridors and vital save points.
If you happen to miss him before he moves to his next destination, his incomplete notes can still be acquired back in Dirtmouth. Visiting Iselda's shop allows you to purchase the document for a slightly higher price so you do not explore blindly. Having this structural baseline makes tracking down hidden secrets significantly less frustrating.
Unlocking Key Abilities and Travel Paths
Progressing through this hazardous region unlocks crucial mobility upgrades that completely alter how you traverse Hallownest. The most notable treasure hidden within these caverns is the Crystal Heart, which enables the Knight to dash horizontally across massive chasms. Reaching this ancient machinery requires surviving a stressful platforming sequence filled with rotating conveyor belts and laser bugs.
Additionally, clearing the western paths allows you to establish a permanent connection back to the Forgotten Crossroads. This shortcut streamlines backtracking and provides faster access to your favorite merchants and stag stations. Exploring thoroughly also reveals a dark drop into the Resting Grounds for players brave enough to plummet into the deep unknown.
Locating Missing Grubs and Pale Ore
For completionists looking to maximize their inventory, this shining mountain houses several vital collectibles scattered behind breakable walls. Multiple trapped Grubs await rescue in the northern shafts, requiring precise nail strikes and careful timing to liberate from their jars. Listening closely for their distinct crying sounds will usually guide you toward their hidden locations.
More importantly, a rare piece of Pale Ore rests at the very summit of the peak, guarded by environmental hazards and tough airborne foes. Securing this precious material is essential for upgrading your nail to its maximum potential at the Blacksmith. Taking the time to map out these specific coordinates ensures your combat capabilities keep pace with late-game challenges.
Defeating the Crystal Guardian
Resting directly on a bench in the center of the map is a formidable foe that blocks a vital resting spot. The Crystal Guardian will abruptly awaken when you attempt to sit down, initiating a fast-paced battle focused on dodging vertical laser beams. Defeating this crystalline warrior clears the bench permanently, providing an incredibly convenient checkpoint for future exploration.
An even tougher variant awaits players who look for secrets directly above the initial arena. Overcoming this secondary challenge rewards you with a valuable mask fragment to increase your overall health pool permanently. Managing your positioning during these fights ensures you can fully exploit the surrounding space without taking unnecessary environmental damage.

all recipes hello kitty island adventure Complete Recipe...
Exploring the vibrant world of Hello Kitty Island Adventure involves more than just meeting adorable Sanrio characters and completing quests. A central pillar of the gameplay relies heavily on your culinary experimentation across the island's many specialized interactive preparation stations. Mastering these diverse systems allows you to create high-value gifts that quickly maximize your individual friendship levels with your favorite island residents.
Unlocking and Utilizing the Core Cooking Stations
Before you can craft every item on the menu, you must locate and upgrade the island's unique appliances. Players begin their culinary journey at Hello Kitty's cozy cafe using the standard Oven to bake basic flour-based treats. As you explore further biomes, you will gradually unlock specialized tools like the Espresso Machine, Pizza Oven, Dessert Boat, and the Teapot.
Each distinct apparatus requires specific friendship progression or quest completions to unlock its full potential. Upgrading these stations allows you to mix up to three separate ingredients simultaneously for complex creations. Keeping track of which machine processes specific components is the first step toward becoming a master island chef.
Essential Ingredients and Recipe Foundations
Every delicious creation starts with a reliable base ingredient that determines the general category of the final dish. For instance, using standard Flour at the oven station yields various cakes and breads depending on your chosen secondary elements. Meanwhile, mixing sweet Candy Clouds or local fruits into the Espresso Machine yields specialized caffeinated beverages tailored to specific villager tastes.
Gathering these items requires daily exploration across different regional biomes, from the swampy depths to the sunny shoreline. Some rare resources can only be obtained by foraging near specialized plants or trading directly with your closest island companions. Experimenting with different combinations will gradually fill your personal cookbook with unique formulas.
Advanced Culinary Delights and Gift Strategy
As you progress into the late-game content, you will encounter high-tier formulas like Jam Crepes, Chai Tea variations, and intricate regional pizzas. Crafting these complex combinations typically requires processing multiple rare ingredients such as Magma Blooms or Cinna Blooms. Delivering these specialized three-star items provides a massive boost to your standing with advanced characters.
Understanding individual character preferences ensures that no valuable ingredients go to waste during your daily routine. Tailoring your kitchen output to match specific character interests is the most efficient way to secure unique progression rewards. Keeping an organized inventory of base items will make your daily baking cycles much smoother over time.

Discipline Record of a Crusade Story Overview and...
The tactical role-playing game community has a fascinating new title to explore with the arrival of Discipline Record of a Crusade. This strategic masterpiece blends a deeply political narrative with robust combat mechanics to create an unforgettable gaming experience. Players are invited to dive into a world where every decision alters the balance of power across a fractured empire.
An Epic Narrative of Faith and Betrayal
The overarching story centers on a holy military order tasked with preserving peace during a massive continental conflict. As players progress, they uncover deep political conspiracies, hidden agendas, and moral gray areas that challenge their initial loyalty. The narrative relies heavily on character choices, ensuring that your interactions with various factions dictate the ultimate fate of the realm.
Unlike traditional fantasy tropes, this title highlights the gritty reality of wartime leadership and institutional corruption. Key characters react dynamically to the ongoing campaign, providing profound narrative weight to every skirmish you command. This focus on realistic storytelling delivers an immersive experience that keeps players emotionally invested from start to finish.
Mastering the Advanced Element Shot System
The core combat experience relies on an innovative turn-based grid layout that rewards careful positioning and environmental awareness. Players must manage a diverse roster of knights, mages, and specialized scouts to counter specific enemy formations. Victory requires a deep understanding of terrain advantages, unit synergy, and defensive positioning.
A standout feature of the combat is the upgraded Element Shot system, which allows units to unleash powerful attacks and strategically control the battlefield. By combining different magical properties, you can trigger devastating chain reactions that decimate enemy lines. This mechanic adds a layer of depth that elevates the standard tactical formula into something truly fresh.
Dynamic Visual Presentation and Art Direction
The aesthetic design brilliantly balances classic pixel art graphics with modern high-definition visual effects during intense combat sequences. As characters and bosses take damage, special cut-in illustrations are dynamically revealed during battle. This artistic choice bridges the gap between retro tactical games and contemporary cinematic presentations.
The atmospheric soundtrack further enhances the tension, shifting seamlessly between quiet camp moments and booming orchestral tracks during boss encounters. Each battlefield feels unique, featuring detailed background animations that bring the broader war-torn world to life. This attention to sensory detail ensures that every strategic victory feels visually and audibly rewarding.
Comprehensive Progression and Customization
Outside of active combat, players manage their military camp to prepare for upcoming operations and build relationships with squad members. The game features an intricate skill tree system where each soldier can be tailored to fill highly specific tactical roles. Investing time in squad management unlocks unique side stories and powerful cooperative abilities on the field.
Resource management plays a vital role as you upgrade weapons, research defensive structures, and fund your campaign. Balancing your limited budget between immediate squad upgrades and long-term research options adds an engaging layer of strategy. For fans seeking deep tactical immersion, checking out the live gameplay reveals just how intricate these progression systems are.

How to Get Goldtusk Destiny 2 Quest and...
Destiny 2 has always excelled at providing class-specific gear that allows players to fully express their chosen playstyle. Among these unique rewards, the legendary sword Goldtusk stands out as an exceptionally agile option reserved strictly for the Hunter class. Tracking down this specialized blade requires navigating targeted vendor systems and mastering high-tier weapon focusing methods within the H.E.L.M.
The Origin and Legacy of the Lightweight Blade
Goldtusk originally debuted as a premium reward tied to late-game activities from past expansions, instantly winning over the community with its custom animations. Unlike traditional swords, this weapon utilizes a Lightweight Frame that alters your character's running posture and provides a significant boost to movement speed. Hunters prioritize this blade because its rapid slashing patterns allow for aggressive mobility strategies during both cooperative strikes and competitive arena matches.
As the sandbox evolved through major updates, Bungie reintroduced this iconic blade with updated perk combinations and full crafting compatibility. This update fundamentally shifted how players approach their loadouts, transforming a rare legacy item into an essential tool for modern endgame builds. Understanding where to spend your hard-earned resources ensures you can secure the pattern quickly without relying entirely on randomized drops.
Acquiring War Table Engrams and Helm Focusing
The primary path to securing this class-specific sword runs directly through the War Table terminal located inside the H.E.L.M. workspace. Players must focus their attention on decoding Recovered Leviathan Weapons engrams to hunt for the specific drops. This focusing option pool contains the legendary class swords, meaning Hunters will systematically receive either Goldtusk or alternative seasonal armor pieces until their collection fills out.
To optimize your farming efficiency, you should consistently participate in seasonal activities and playlists that award high volumes of standard engrams. Once your inventory is full, return to the digital storefront kiosk to focus your rewards into targeted weapon drops. Dedicated guardians can accelerate this loop by unlocking passive seasonal upgrades that increase overall engram drop rates across the solar system.
Unlocking the Crafting Pattern for the Perfect Roll
Securing a standard drop is only the initial step for completionists who want to maximize the true potential of their gear. To unlock the permanent shaping blueprint at the Enclave, you must successfully extract Deepsight Resonance patterns from multiple red-bordered versions of the sword. Once you claim enough pattern progress, you gain absolute freedom to customize the weapon's perks, guard types, and blade materials to match your exact tactical requirements.
When planning your ideal roll, look for powerful combinations that synergize with high-mobility combat loops. Perks like Relentless Strikes and Whirlwind Blade remain incredibly potent choices for sustaining massive damage against major boss targets. Additionally, crafting an enhanced version of these perks elevates your performance ceiling, ensuring your Hunter remains highly competitive during intense endgame encounters.

Storm Sorcerer Tempest Cleric BG3 Multiclass Build Guide
Creating a powerful spellcaster in Baldur's Gate 3 often requires blending the unique strengths of different magical classes together. The combination of a Storm Sorcerer and a Tempest Domain Cleric stands out as one of the most devastating elemental builds available in the game. By combining structural defenses with unmatched lightning burst potential, this specific character setup allows you to control the battlefield while obliterating groups of enemies instantly.
The Core Mechanics of Lightning Synergy
The true power of this multiclass setup relies entirely on the unique interaction between Sorcerer spells and Cleric class features. Taking a two-level dip into the Tempest Cleric unlocks the iconic Channel Divinity feature known as Destructive Wrath. This allows you to automatically maximize your lightning or thunder damage rolls instead of relying on random dice results. When paired with high-level Sorcerer spells like Lightning Bolt or Chain Lightning, the burst potential becomes absolutely unmatched.
Furthermore, beginning your journey with a level in Sorcerer grants you essential proficiency in Constitution saving throws. This structural advantage helps you maintain concentration on key offensive spells even when taking direct damage in the heat of battle. The Tempest Cleric levels also provide immediate proficiency with heavy armor and shields, transforming a traditionally fragile spellcaster into a frontline powerhouse.
Optimizing Your Level Split and Progression
To maximize your overall efficiency, a final level distribution of ten Storm Sorcerer levels and two Tempest Cleric levels is highly recommended. You should ideally start as a Sorcerer at level one to secure your saving throw advantages before taking your two Cleric levels immediately after. This path unlocks your armor proficiencies and Destructive Wrath early enough to dominate the challenging encounters found throughout the first two acts.
The remaining levels should be dedicated entirely to advancing your Storm Sorcerer progression to unlock advanced metamagic options. Utilizing Twinned Spell and Quickened Spell modifiers allows you to cast multiple maximized elemental spells during a single turn. This level split ensures you still receive high-level spell slots to upcast your primary offensive abilities during endgame encounters.
Essential Spells and Battlefield Setup
Maximizing your elemental damage output requires proper battlefield preparation and understanding status conditions. Applying the Wet condition to your targets using the Create Water spell or environmental items is absolutely mandatory because it doubles all incoming lightning damage. Striking a wet target with a maximized lightning spell results in an immediate catastrophic explosion of damage that can clear entire rooms.
Your primary offensive repertoire will center around versatile options like Call Lightning and Witch Bolt during the mid-game phase. As you reach the later stages of your adventure, upcasted versions of these spells will comfortably carry your party through major boss fights. You should also utilize defensive options like Shield and Misty Step to maintain perfect positioning while avoiding incoming threat zones.
Gear Selection for Ultimate Storm Power
Equipping the right magical items will significantly elevate your elemental capabilities and spell save DC throughout the campaign. Look for items that grant bonus lightning charges or add additional thunder damage to your spellcasting output. Heavy armor options that mitigate incoming damage or prevent you from being knocked prone will perfectly complement your high defensive stats.
Staffs that enhance your spell modification attributes or provide free casts of chain lightning are ideal choices for your weapon slot. Combining these powerful artifacts with your maximized passive abilities ensures your character remains an unstoppable force from early skirmishes to the final battle. Balancing strategic spell preparation with aggressive positioning offers the ultimate way to experience this electrifying build.

Bloons TD 6 Cheat Engine Risks and Gameplay...
Bloons TD 6 has captivated millions of strategy fans worldwide with its deep tower defense mechanics and regular content updates. While the challenge of beating difficult maps like CHIMPS mode drives the community, some players look for shortcuts using memory manipulation software like Cheat Engine. Altering game data can unlock unlimited cash or instant monkey upgrades, but it also carries heavy consequences for your account stability. Understanding how these tools interact with the game can help you navigate the modding landscape safely without losing your progress.
The Direct Consequences of Using Cheat Engine
Using third-party memory editors to alter your in-game currency or tower stats triggers immediate flags in the developer's tracking system. Ninja Kiwi implements robust server-side checks that monitor account progression and leaderboard submissions for anomalous activity. When a discrepancy is detected, your account is typically placed in a separate pool, effectively cutting you off from public co-op matches and competitive events. This isolation ruins the multiplayer experience and leaves you unable to participate in official community challenges.Beyond competitive restrictions, manipulating data values can destabilize your game memory and cause frequent performance issues. Altering variables that control tower ranges or attack speeds often conflicts with standard logic calculations, leading to instant application crashes. In worst-case scenarios, corrupting your active data stream can permanently damage your local save files, forcing you to delete your history and start the strategy journey over from the beginning.
Safe Alternatives Through Approved Game Modding
For players who want to experiment with custom rulesets without risking an account ban, the official community offers structured paths for gameplay modding. Safe modifications are designed to run completely offline or within dedicated sandbox environments that do not communicate with the live competitive matchmaking servers. Utilizing these approved frameworks allows you to test unique tower combinations and custom maps while keeping your primary profile perfectly secure.
The dedicated modding scene provides a massive variety of custom content, ranging from entirely new monkey towers to visual overhauls that refresh the classic aesthetic. These community projects rely on open-source code loaders rather than invasive memory injectors, making them far more stable over long gaming sessions. Exploring these creative additions offers a fresh gameplay perspective without violating the terms of service or ruining the balance of online leaderboards.
Best Practices for Maintaining Account Health
If you decide to explore the world of custom gameplay changes, maintaining a strict barrier between modded setups and your official profile is vital. Always create a complete backup of your original save files before moving files into your directory or opening external configuration programs. Running your custom experiments exclusively in an offline state ensures that unintended data updates never sync with your cloud saving profile.
Ultimately, enjoying the sandbox versatility of Bloons TD 6 should never come at the expense of fair play or technical stability. Prioritizing community-approved mod loaders over crude software hacks protects your hard-earned achievements while granting access to creative variations. By respecting the built-in tracking systems, you can safely expand your tower defense experience without sacrificing your online access.

Where to Find Caroline Stardew Valley Schedule Location...
Building meaningful connections with the residents of Pelican Town is a cornerstone of the Stardew Valley experience, and Caroline stands out as one of the community's most pleasant figures. As the wife of the local general store owner Pierre and the mother of Abigail, she balances managing her household with hosting community events like weekly aerobics classes. Understanding her movements and preferences is essential for players looking to unlock her unique heart events and valuable crafting recipes.
Tracking Caroline Daily Movements and Schedule
Caroline spends a significant portion of her day inside Pierre General Store, making the shop your primary destination when hunting for her. On sunny mornings, she frequently ventures out to stand near the town fountain or converse with other villagers in the town square. Her weekly routine changes dramatically on Tuesdays, when she hosts a fitness group in her living room alongside several other local women.
During rainy days or late evenings, she generally stays confined to her private kitchen or adjacent living spaces. Navigating her house can sometimes be tricky if you do not arrive during standard business hours, as the store doors lock promptly at six in the evening. Keeping a close eye on seasonal shifts is also wise, as she tends to visit the local spa or take longer outdoor walks during the pleasant summer afternoons.
Unlocking the Tea Sapling in the Secret Sunroom
One of the greatest incentives for befriending Caroline is gaining access to her beautiful, hidden sunroom located through the door in her kitchen. To enter this peaceful sanctuary, players must first reach a two-heart friendship level with her by engaging in regular conversations and offering gifts. Once this milestone is achieved, stepping into the room triggers a special cutscene where she shares a relaxing herbal beverage with the player.
Following this intimate encounter, she will send a unique crafting recipe for tea saplings directly to your farmhouse mailbox the very next morning. This item serves as an incredible passive income source early in the game, as tea leaves can be harvested daily during the final week of spring, summer, and fall. Investing time into unlocking this area provides both a scenic retreat and a substantial economic boost to your agricultural empire.
Best Friendship Gifts and Conversation Tips
Accelerating your relationship with Caroline requires a solid understanding of her personal tastes, which favor healthy greens and vibrant floral arrangements. She absolutely loves receiving Summer Spangles and Fish Tacos, making these excellent items to save for her birthday on the seventh day of winter. Additionally, she highly appreciates most universally liked items, such as artisan goods, honey, and fresh tree fruits harvested from your orchard.
Conversely, players must be careful to avoid gifting her quartz or items containing mayonnaise, as she strongly dislikes these common resources. Regular daily chats also provide a steady stream of friendship points without costing any hard-earned gold or valuable crops. Combining thoughtful birthday offerings with steady communication ensures you will maximize your standing with her in no time.

Best Feats For Rogue BG3
Mastering the Rogue class in Baldur's Gate 3 requires a deep understanding of how positioning, stealth, and critical strikes synergize with tactical character customization. Choosing the right feat during your leveling milestones can drastically enhance your damage output or bolster your utility outside of combat. Since Rogues naturally excel at exploiting enemy vulnerabilities, your choice of specializations should focus on maximizing these inherent class advantages.
Sharpshooter for Ranged Dominance
For players who prefer eliminating targets from a safe distance, Sharpshooter stands out as an unparalleled choice. This option removes the low-ground penalty, allowing your character to maintain optimal positioning regardless of the shifting vertical terrain. Additionally, you can trade a minor penalty to your accuracy for a massive flat bonus to your ranged damage results.
When combined with the Rogue's steady source of advantage through cunning stealth actions, the accuracy penalty becomes entirely negligible. This synergy transforms your standard back-line sniper into a lethal threat capable of erasing enemy health bars in a single turn. It remains an essential cornerstone for any build focused on bows or heavy crossbows.
Savage Attacker for Frontline Combat
If your tactical preference leans toward dual-wielding daggers or rapiers in close quarters, Savage Attacker offers exceptional consistency. This martial ability allows you to roll your weapon damage dice twice whenever you make a successful melee weapon attack, automatically using the highest result. It ensures that your standard strikes rarely suffer from low damage rolls during critical encounters.
While it does not apply to your Sneak Attack bonus dice, it significantly raises the baseline damage of your physical weapons. This feature is especially powerful when your character executes multiple off-hand strikes across a prolonged engagement. It provides a reliable layer of martial efficiency that keeps frontline fighters competitive against heavily armored targets.
Ability Improvements for Core Attributes
Sometimes the most effective tactical choice is simply maximizing your primary statistics to ensure your passive checks remain flawless. Investing your milestone points directly into Dexterity increases your attack accuracy, armor classification, and initiative rolls simultaneously. This straightforward upgrade ensures you consistently act first during sudden combat ambushes.
Higher core attributes also directly boost your proficiency in essential exploration skills like Sleight of Hand and Stealth. This makes it much easier to disarm dangerous traps and bypass secure security locks throughout your journey. Balancing specialized combat maneuvers with pure stat progression is key to building an adaptable party leader.
Lucky for Ultimate Fate Control
The Lucky feat introduces a versatile pool of luck points that can completely change the outcome of a disastrous combat scenario. This feature allows you to gain advantage on attack rolls, ability checks, or saving throws whenever an unexpected failure occurs. It acts as an exceptional defensive safety net when navigating dangerous tactical situations.
You can also use these special points to force an attacking enemy to reroll their accuracy, potentially turning a lethal critical hit into a harmless miss. This unique level of battlefield manipulation ensures that bad luck rarely derails your strategic plans. It represents a fantastic utility option for players who value absolute consistency across every aspect of gameplay.

Games Like Pathfinder Wrath Of The Righteous For...
Pathfinder: Wrath of the Righteous has cemented its place as a masterpiece for fans of deep, isometric computer role-playing games. Its intricate alignment systems, massive mythic progression paths, and faithful adaptation of tabletop rules offer unparalleled mechanical depth. If you have finished your crusade and are looking for another epic digital adventure, several remarkable titles can satisfy your craving for complex narrative design.
Exploring the Predecessor in the Stolen Lands
Before diving into the Worldwound, Owlcat Games explored the tabletop universe with their initial adaptation, Pathfinder: Kingmaker. This title features the same core rule set and dense character customization that veteran tactical players adore. However, it introduces a unique kingdom management layer that requires you to balance regional politics alongside traditional dungeon crawling.
The narrative tone shifts from an apocalyptic holy war to a gritty tale of political consolidation and wilderness exploration. While it lacks the extreme power scaling of the mythic paths, the mechanical familiarity makes it a perfect next step. Managing your barony provides a distinct sense of progression that beautifully complements your standard adventuring loop.
The Pinnacle of Modern Tactical Freedom
For players who want an unmatched level of environmental interaction and mechanical synergy, Divinity: Original Sin 2 stands out as an essential experience. Developed by Larian Studios, this isometric adventure replaces strict tabletop rulebooks with a highly reactive elemental physics engine. You can combine rain spells with lightning to stun entire groups of enemies or turn standard pools of oil into blazing battlefields.
The game features an incredibly rich origin character system where your chosen protagonist radically alters how NPCs react to your presence. The story explores themes of divinity and persecution in a vibrant fantasy world that rewards creative problem-solving. This sandbox approach ensures that no two playthroughs feel identical, offering incredible replay value for hardcore genre enthusiasts.
Classic Foundations and Spiritual Successors
If the deep lore and party-based mechanics of modern titles appeal to you, exploring the classic roots of the genre is highly recommended. Pillars of Eternity serves as a magnificent spiritual successor to legendary infinity engine games, offering a beautifully realized original fantasy setting. The real-time-with-pause combat configuration requires the same level of micro-management and tactical positioning as the Pathfinder series.
The narrative focuses on a soul-born curse affecting a struggling nation, forcing your character to navigate complex philosophical questions. The rich text descriptions and deeply atmospheric world-building cater directly to enthusiasts who enjoy reading detailed lore books. It delivers a mature, beautifully paced story that respects your intelligence and tactical choices from start to finish.
Epic Multi-Dimensional Narrative Scale
Finding games that match the sheer scope of a demonic crusade can be challenging, but Baldur's Gate 3 successfully captures that grand sense of adventure. This groundbreaking title utilizes the modern fifth edition Dungeons and Dragons rules to deliver a cinematic, high-stakes narrative. The cinematic presentation brings your companions and choices to life with incredible emotional fidelity.
The tactical combat challenges your positioning and resource management across beautifully vertical map layouts. Its story features cosmic threats, intricate personal companion quests, and massive player agency that shapes the fate of entire civilizations. For those seeking an unforgettable journey, exploring games like Pathfinder provides the perfect gateway into these legendary digital realms.

What Is V Sync and How Does It...
Understanding display settings is crucial for optimizing your PC gaming experience, especially when balancing visual clarity and hardware performance. Vertical Synchronization, commonly known as V-Sync, is a legacy display technology designed to harmonize your graphics processor with your monitor refresh rate. By managing how frames are delivered to your display, V-Sync directly shapes image stability, fluid movement, and responsiveness during gameplay sessions.
What Is V-Sync and How Does It Function
Vertical Synchronization serves as a communication bridge between your graphics processing unit and your display hardware. When active, it prevents the graphics card from rendering new frames faster than the monitor can update its screen. This artificial cap aligns the frame delivery with the physical refresh intervals of your display panel.
By default, graphics cards push rendered frames as quickly as possible without considering screen readiness. V-Sync creates a controlled queue that holds completed frames until the monitor begins a new refresh cycle. This systematic pacing ensures that only fully rendered, complete images appear on your screen during action sequences.
Fixing Visual Artifacts and Screen Tearing
The primary reason gamers enable V-Sync is to eliminate a visual anomaly known as screen tearing. Screen tearing occurs when a graphics card sends multiple partial frames to the display mid-refresh, creating horizontal misalignments across the image. Enabling V-Sync forces the GPU to sync with the display, producing a seamless, distraction-free visual experience across various environments.
Without synchronization, fast camera movements in action titles frequently expose these harsh visual splits. V-Sync resolves this issue completely by ensuring every displayed line belongs to the same distinct frame rendering pass. Players who prioritize immersion and overall visual cleanliness often rely on this setting to maintain image integrity.
The Impact of V-Sync on Input Lag and Performance
While V-Sync effectively corrects visual imperfections, it introduces trade-offs regarding responsiveness and frame timing. Holding rendered frames in a buffer delays the moment your button presses register on screen, resulting in noticeable input lag. For fast-paced competitive games, this slight delay can hinder precision aiming and instantaneous reaction times.
Furthermore, if your system cannot match your monitor's native refresh rate, V-Sync can cause sudden frame rate drops. When performance dips below target thresholds, frame delivery can plummet to half the monitor refresh rate to stay synchronized. This sudden deceleration causes visible stuttering, which negatively impacts gameplay fluidity during demanding scenes.
When to Turn On or Disable V-Sync
Deciding whether to activate V-Sync depends heavily on the specific genres you play and your hardware capabilities. In single-player RPGs, story-driven adventures, and slower tactical games, turning V-Sync on provides a beautiful, tear-free presentation without hindering your overall performance. It also prevents your graphics card from overworking itself, keeping overall system temperatures lower.
Conversely, turning V-Sync off is generally recommended for high-stakes multiplayer shooters and esports titles where every millisecond counts. Modern alternatives like G-Sync and FreeSync provide variable refresh rate technology that eliminates tearing without the severe input latency associated with traditional V-Sync. Evaluating your hardware capabilities and personal gaming preferences will help you choose the ideal display configuration.

Persona 5 Royal Difficulty Options Compared
Navigating the stylish world of Persona 5 Royal requires players to balance high school life with intense supernatural dungeon crawling. Choosing the right challenge level heavily impacts how you experience combat, resource management, and story progression throughout this massive JRPG journey. Atlus offers five distinct settings that cater to everyone from complete newcomers to seasoned tactical veterans looking for the ultimate test.
The Standard Experience from Safety to Hard
Safety and Easy options are tailored specifically for players who wish to focus primarily on the intricate narrative and social links. The Safety mode goes a step further by ensuring you can never receive a game over, allowing instant retries in battle while granting massive experience and money boosts. Easy mode provides a gentle challenge where combat remains interactive but highly forgiving if you make tactical mistakes.
Normal mode represents the baseline balanced gameplay experience that developers originally intended for the average JRPG enthusiast. Enemies deal standard damage and take normal amounts of punishment, demanding a basic understanding of elemental weaknesses without being overly punishing. Hard mode increases enemy damage significantly and reduces the damage your team inflicts, forcing you to utilize status ailments and buffs to survive.
The Uniquely Balanced Merciless Mode
Merciless difficulty presents a fascinating mechanical twist rather than a straightforward statistical increase in difficulty. In this mode, the damage multiplier for critical hits, technical damage, and elemental weakness exploitation is tripled for both allies and enemies. This creates a high-stakes environment where a well-planned ambush can wipe out a shadow mob instantly, but a single mistake can lead to your own immediate demise.
Many experienced players actually find Merciless easier than Hard mode once they master the combat mechanics. Because exploiting weaknesses deals massive damage, boss fights and regular encounters can end much faster if you possess the right roster of Personas. However, you must remain incredibly vigilant, as enemies will capitalize on your party members weaknesses with the exact same lethal efficiency.
Choosing the Best Path for Your Playthrough
First-time players who are unfamiliar with modern turn-based RPG systems should generally start on Normal to comfortably learn the flow of the game. Fortunately, Persona 5 Royal allows you to freely swap between Easy, Normal, Hard, and Merciless at any point during the story menu. The only major exception is the Safety setting, which permanently locks your game into that mode for the remainder of the playthrough once selected.
If you enjoy meticulous planning and min-maxing your team builds, starting on Hard or Merciless will provide a deeply rewarding tactical loop. Managing your SP reserves becomes much tighter on higher settings, requiring smart utilization of vending machines and classroom crafting sessions. Ultimately, selecting the perfect setting ensures that your journey with the Phantom Thieves remains engaging from the opening heist to the final grand finale.

Is Resident Evil 7 Co Op And Can...
Navigating the terrifying corridors of Capcom's modern survival horror masterpiece can be a deeply unsettling experience when facing the nightmare alone. Many players looking to share the dread wonder if they can bring a companion along to survive the horrors of the Baker family plantation. Understanding the game's structural design helps clarify what options are available for multiplayer enthusiasts.
The Core Campaign Design and Multiplayer Limitations
Resident Evil 7 Biohazard was developed strictly as a single-player, first-person survival horror experience. The developers focused entirely on building isolated tension and atmospheric dread that relies on the player being completely alone. Consequently, there is no official built-in option to invite your friends to join the main story campaign.
This design choice marks a significant departure from its immediate predecessors, which heavily emphasized cooperative mechanics. By removing the safety net of a partner, the game successfully forces players to manage their limited resources without outside help. The lack of traditional multiplayer functions ensures that every encounter with the Baker family remains intensely personal and terrifying.
Exploring Alternative Ways to Share the Dread
While direct online integration is absent from the campaign, players have found creative ways to share their gameplay sessions with friends. Streaming your playthrough via digital platforms or hosting local pass-the-controller sessions offers an engaging way to experience the narrative together. Watching a companion navigate the dark hallways provides a unique form of entertainment that still captures the game's tense social dynamic.
For those looking to enhance their immersion further, virtual reality hardware presents an exceptional alternative. Experiencing the atmospheric environments through a headset amplifies the tension significantly for anyone watching nearby. If you want to expand your gaming options beyond survival horror, you can explore online to manage your multiplayer collection seamlessly.
How the Extra Content and DLC Expand the Experience
Even though the main story is built for a single survivor, Capcom released several post-launch expansions that experiment with unique gameplay styles. These additions introduce varied combat scenarios, puzzle mechanics, and historical contexts that flesh out the overarching narrative. However, even these specialized DLC packages remain entirely focused on individual progression rather than team dynamics.
The emphasis on solo survival remains consistent across the strategic challenges introduced in the post-game modes. Players looking for traditional cooperative action will need to look toward other installments within the broader franchise. Recognizing these structural boundaries allows you to adjust your expectations and fully appreciate the solitary nightmare intended by the creators.
Preparing Your Survival Strategy for Solo Play
Conquering the challenges of the plantation requires careful planning, keen environmental awareness, and strict ammunition management. Without a partner to watch your back, mastering the defensive blocking mechanic becomes absolutely vital for reducing incoming damage. Taking your time to search every room ensures you do not miss hidden items that are critical for upgrading your arsenal.
Learning the layout of the primary safe rooms provides a reliable sanctuary where you can safely organize your inventory box. Balancing your equipment loadout prevents you from becoming overwhelmed during sudden ambushes in the dark. Embracing the isolation ultimately delivers a highly rewarding victory that tests your personal resolve against the ultimate horror.

Mishima Confidant Persona 5 Royal Rank Answers And...
Navigating the complex social dynamics of Persona 5 Royal is essential for unlocking powerful combat advantages and experiencing the full emotional depth of the narrative. Among the various relationships the protagonist can cultivate, the Moon Confidant stands out as a unique link tied directly to the public perception of the Phantom Thieves. Managing this relationship effectively allows players to optimize their party management and streamline the experience points gathered throughout their dungeon excursions.
Unlocking the Moon Arcana and Dialogue Choices
Yuuki Mishima formally initiates his story arc automatically as the narrative progresses after the first major palace infiltration. Unlike other characters who require matching personas to boost relationship points, Mishima ranks up consistently regardless of your dialogue answers. However, selecting supportive dialogue choices allows you to engage with his character development in a more meaningful way as he struggles with his newfound internet fame.
Many players find that keeping track of his alternating locations between Shibuya and Shinjuku helps prevent missed opportunities during open evening slots. Choosing answers that encourage his dedication to the Phantom Thieves website, rather than feeding his growing ego, provides the most satisfying narrative resolution. Balancing your responses keeps the dialogue engaging while ensuring you remain on track to maximize the relationship levels before the late-game deadlines arrive.
Essential Mementos Requests and Rank Progression
Advancing through the various tiers of the Moon Confidant requires more than just casual conversations at night. Mishima acts as the primary source for Mementos requests, requiring players to complete specific side missions to trigger subsequent rank events. Neglecting these requests can temporarily stall your progression, making it crucial to clear the subway dungeons regularly throughout the school year.
As you complete these targeted missions, Mishima will continually update the Phan-Site with new targets and information. Ensuring that you check your instant messages promptly guarantees that you do not miss critical quest triggers necessary for his final ranks. This continuous gameplay loop rewards thorough exploration and tactical preparation inside the shifting subterranean pathways of Tokyo.
Maximizing Experience Point Rewards and Fusions
The primary benefit of dedicating your valuable free time to the Moon Confidant lies in its exceptional experience point modifiers. Early ranks grant passive bonuses that allow backup party members to earn a percentage of experience from active battles. Maximizing this specific path eventually grants the entire roster equal experience gains, completely eliminating the need for tedious individual character grinding.
Reaching the final rank of this social bond unlocks the ultimate Persona of the Moon Arcana for advanced velvet room fusions. This powerful entity grants access to high-tier magical skills and defensive capabilities that are highly beneficial during the challenging endgame encounters. Investing in Mishima ultimately reshapes how you manage your team composition and combat readiness for the final narrative chapters.

Zelda Tears Of The Kingdom Fabric Locations And...
Expressing personal style while soaring through the skies of Hyrule has become a major highlight for adventurers exploring the vast open world. The Legend of Zelda Tears of the Kingdom introduces an expansive customization feature that allows players to collect rare textiles scattered across the land. By hunting down these unique rewards, you can drastically alter the appearance of your essential traversal tool to match your favorite armor sets.
Visiting the Kochi Dye Shop
To begin your customization journey, you must head over to Hateno Village located in the southeastern portion of the map. Inside this vibrant settlement, a passionate designer named Sayge runs the local boutique and handles all adjustments to your glider. For a small fee of rupees, he will gladly swap out your current patterns for any new visual styles you have unlocked during your travels.
Understanding this mechanic encourages players to meticulously scan their surroundings for hidden treasures while completing main story quests. The shop also serves as a central hub where you can preview how different patterns react to various environmental lighting. Collecting these items adds an extra layer of progression that rewards thorough exploration across both the surface and the skies.
Finding Fabrics Through Quests and Mini Games
Many of the most iconic paraglider patterns are locked behind specific side stories and regional challenges scattered across the kingdom. For instance, assisting the local stable masters or participating in horse racing challenges will unlock specialized regional insignias. Completing these optional objectives rewards your dedication with striking visuals that represent the history of different Hyrulian factions.
Other valuable textiles can be discovered by helping prominent citizens solve complex environmental puzzles in major towns. Reaching the highest ranks in specific mini-games will also grant you access to rare geometric aesthetics. These challenges ensure that your achievements are visibly displayed whenever you choose to glide down from the sky islands.
Unlocking Designs with Monster Photography
An innovative method for acquiring fresh glider looks involves utilizing the camera function on your Purah Pad to document local wildlife. Sayge will frequently request high-quality photographs of specific legendary monsters roaming the dangerous wilderness. Capturing clear images of these formidable beasts allows the designer to recreate their unique skin textures and color palettes on canvas.
This gameplay loop forces players to closely observe the behaviors of unique creatures like Gleeoks, Lynels, or Chuchus in their natural habitats. Successfully returning with the requested photographic proof expands your cosmetic inventory with vibrant, monster-themed options. It transforms standard exploration into a rewarding hunting experience that directly influences your character design.
Nostalgic References to Past Adventures
For longtime fans of the franchise, the customization system offers incredible fanservice by incorporating classic nods to previous games. Certain hidden chests located deep within ancient ruins contain patterns inspired by historical iterations of Link. These visual callbacks allow veteran players to evoke the spirit of classic titles while exploring the modern landscape.
Whether you prefer the regal symbols of the Royal Family or the rustic charm of ancient tribal patterns, the variety ensures every playstyle is accommodated. Tracking down every single pattern requires a balanced mix of combat prowess, puzzle-solving skills, and cartographic dedication. Ultimately, updating your gear turns a practical gameplay mechanic into a highly personalized journey through Hyrule.

Best Laptop For Programming And Gaming On Any...
Finding a single machine that excels at both software development and intensive gaming can be a challenging endeavor for professionals and enthusiasts alike. The overlapping requirements of these tasks demand robust processing power, fast memory layouts, and reliable cooling systems to maintain performance under sustained workloads. Balancing these technical needs against financial constraints requires a clear understanding of what hardware components matter most for your specific workflow.
Evaluating Core Components for Dual Workloads
When selecting a system for writing code and running modern visual titles, the central processor remains the primary engine of your experience. A higher core count directly improves compilation speeds for massive codebases while preventing bottlenecks during physics-heavy gaming sessions. Look for modern architectures that balance power efficiency with high single-core performance to handle diverse computing tasks smoothly.
Memory allocation is equally vital when multitasking across virtualization environments and dense graphical applications. Opting for a minimum of sixteen gigabytes of rapid memory ensures your operating system has enough breathing room to manage background services without stuttering. Upgrading this component later can extend the operational lifespan of your device significantly as modern software requirements continue to grow.
Budget Options for Entry Level Users
Entering the dual world of coding and entertainment does not require spending thousands of dollars upfront. Many manufacturers offer introductory systems featuring integrated graphical solutions or entry-level dedicated cards that handle popular multiplayer titles effortlessly. These entry-level configurations provide a reliable foundation for students learning syntax while offering decent frame rates on casual gaming platforms.
Storage space should always utilize solid-state architecture to minimize boot sequences and deployment times during software compilation. Having a fast drive allows you to manage active project folders efficiently while maintaining a small library of classic games. Choosing a system with secondary expansion slots gives you the flexibility to add more storage capacity down the line when your budget allows.
Mid Range Champions Balancing Price and Power
Stepping into the mid-tier category introduces dedicated graphics cards that unlock high-definition gaming and advanced computing tasks like machine learning. These balanced laptops often feature improved display panels with higher refresh rates, making them exceptionally comfortable for long coding sessions and fast-paced gaming alike. The thermal design in this tier is generally more sophisticated, allowing components to run at maximum speeds without excessive thermal throttling.
For developers who frequently work on the move, battery optimization becomes an important factor alongside raw performance metrics. Mid-range systems often strike the perfect balance, offering power efficiency during light productivity tasks and peak performance when plugged into a power source. Investing in this tier ensures your hardware remains relevant and capable for several years of evolving software updates.
Premium Systems for Ultimate Professional Performance
Top-tier laptops represent the pinnacle of portable computing, utilizing cutting-edge processors and maximum graphics configurations to obliterate demanding workloads. These premium machines easily handle complex game development engines, massive data sets, and cinematic titles running at maximum graphical presets. The premium build quality typically includes advanced aluminum chassis designs, exceptional keyboards, and professional-grade color accuracy across the display panel.
While the initial financial investment is substantial, the time saved during compilation and rendering quickly offsets the premium cost for working professionals. These configurations act as complete desktop replacements, providing the absolute peak capability required for modern software creation and elite gaming experiences anywhere in the world.

Fable 3 Silver Key Locations Complete Collection Guide
Exploring the vast and beautifully detailed world of Albion in Fable 3 offers players an immersive blend of royal politics, intense combat, and extensive exploration. Among the many collectibles scattered throughout the kingdom, tracking down all 50 Silver Keys remains one of the most rewarding challenges for dedicated adventurers. Securing these gleaming treasures allows you to unlock valuable chests that contain powerful weapons, rare items, and essential guild seals to bolster your hero's journey.
Navigating the Early Regions of Albion
Your search begins in the snowy peaks and humble settlements that define the early chapters of the main campaign. Areas like the Dweller Camp and Mistpeak Valley contain cleverly hidden paths that often require you to deviate from the glowing trail. Many of these early keys are tucked behind frozen rocks or located inside complex cave systems that are easily overlooked if you rush through the area.
As you progress toward Brightwall Village, the density of hidden treasures increases significantly. Checking behind local buildings, exploring under wooden bridges, and systematically searching the academy library will reveal several well-placed items. Developing a keen eye for subtle environmental clues early on will save you massive amounts of backtracking during the endgame cleanup phases.
Uncovering Secrets in the Industrial Centers
Moving into the urban sprawl of Bowerstone Industrial and the surrounding city districts reveals a completely different layout for collectible placement. The environments shift from natural mountain trails to complex sewers, dark alleys, and heavily guarded factories. Navigating these industrial sectors requires a strategic approach, as several collectibles are locked behind environmental puzzles or specific story progression milestones.
For instance, gaining access to certain secure warehouses or subterranean passages often demands completing local side quests for the citizens. If you are having trouble reaching a particularly stubborn target, focusing on local community tasks can frequently open up the necessary pathways. Adventurers who want to optimize their exploration routes can also look up a video walkthrough to pinpoint exact spatial positioning within these multi-layered urban grids.
Conquering the Remote Wilderness and Castles
The late-game regions of Albion introduce vast open wilderness areas and royal architecture that hold some of the most elusive items in the game. Places like Millfields and the shifting sands of Aurora feature grand estates and massive ruins that require thorough investigation. You will often need to solve intricate switch puzzles or dive into deep bodies of water to retrieve your prize.
Bowerstone Castle itself houses high-value secrets that are only accessible after key political changes occur in the storyline. Patiently checking the royal gardens, private tombs, and hidden catacombs ensures that your collection status reaches completion before the final conflict. Balancing your main royal duties with thorough exploration yields the absolute best results for your growing arsenal.
Maximizing the Rewards of the Silver Chests
Collecting the keys is only half the battle, as finding the corresponding locked chests scattered across Albion is just as vital. These heavy stone containers require specific amounts of keys to open, ranging from simple early-game boxes to legendary vaults that demand a flawless collection status. The unique weapons and character modifiers found inside these chests can drastically alter your combat efficiency and playstyle.
Ultimately, achieving a perfect score in your collection log serves as a testament to your thorough mastery of Albion's geography. By systematically clearing each zone and tracking your progress region by region, you can efficiently claim every advantage the game has to offer. Prepare your gear, talk to the local townsfolk, and enjoy the ultimate treasure hunt across this classic role-playing experience.

Elden Ring Strength Faith Weapons Best Builds And...
Mastering the unforgiving landscapes of Elden Ring requires a delicate balance between defensive resilience and offensive power. Mixing high physical damage with devastating holy or flame incantations creates a versatile character capable of tackling the game's toughest bosses. Players who adopt this hybrid archetype gain access to some of the most spectacular offensive tools and supportive magic available in the Lands Between.
Foundational Attributes for Divine Warriors
To establish a functional hybrid character, distributing your attribute points correctly across your major statistics is incredibly important. You should prioritize pushing your Vigor to competitive thresholds while ensuring you possess enough Endurance to carry heavy armor sets. Allocating points evenly into heavy physical power and magical scaling unlocks the true scaling potential of your specialized armament arsenal.
As you progress into the late-game areas, maximizing your primary damage attributes yields massive scaling returns. Investing heavily in your magical attributes also boosts the raw potency of essential offensive incantations. Balancing your FP management ensures you can consistently cast powerful spells during prolonged encounters without running out of resources entirely.
Top Tier Armaments for Heavy Casters
Choosing the correct weapon forms the emotional backbone of your entire combat loop. Colossal options like the Blasphemous Blade provide incredible flame damage alongside unique skills that steal life from defeated opponents. Alternatively, massive holy hammers allow you to posture break colossal enemies quickly while dealing devastating elemental damage with charged strikes.
For players who prefer quicker engagement options, specialized greatswords offer fluid movesets without sacrificing elemental scaling capabilities. Infusing standard heavy armaments with specific sacred or flame affinities remains an excellent strategy for personalizing your kit. These customizable configurations ensure you can adapt to the defensive weaknesses of different regional bosses.
Essential Incantations and Strategic Buffs
A true divine warrior relies heavily on a robust selection of defensive and offensive magic to complement their physical toolkit. Utilizing legendary protective spells significantly increases your physical damage negation during intense boss fights. The combination of health regeneration and defensive enhancements allows players to survive critical mistakes that would normally cause instant defeat.
For offensive scenarios, throwing giant spheres of fire or summoning holy rings provides reliable ranged options. These magical projectiles allow you to pressure dangerous opponents from a safe distance before moving in for melee follow-ups. Integrating these diverse magical options transforms standard martial combat into a highly dynamic and expressive playstyle.
Optimizing Equipment and Talisman Synergy
Maximizing your total damage output requires careful selection of supportive equipment pieces and mystical accessories. Equipping specialized medallions that increase elemental damage boosts both your weapon skills and your corresponding offensive spells. Combining these offensive boosters with defensive stamina talismans guarantees fluid mechanical transitions during complex movement phases.
Your choice of armor also plays an important role in maintaining high poise thresholds during heavy swing animations. Wearing sturdier gear prevents minor enemy strikes from interrupting your slow, high-damage charged attacks. Ultimately, aligning your protective gear, physical armaments, and magical slots creates an unstoppable character capable of conquering the ultimate challenges.

When Does Mitsuru Social Link Start Persona 3...
Navigating the complex social landscape of Persona 3 Reload requires players to balance their time between scaling Tartarus and building meaningful relationships. Among the most anticipated late-game relationships is the Empress Arcana, which features the brilliant and refined student council president, Mitsuru Kirijo. Unlocking her narrative path requires extraordinary dedication to self-improvement, making it one of the final hurdles for completionists looking to maximize their connections before the story reaches its dramatic conclusion.
Unlocking the Empress Social Link
Unlike many companions who become available during the spring or summer semesters, Mitsuru requires players to wait until the final stretch of the school year. Her social contract officially becomes accessible on November 21st, immediately following the completion of the school trip. This late arrival means players have a compressed window to complete all ten ranks before the final deadline in January.
To initiate the first conversation, you must approach Mitsuru near the faculty office on the first floor of Gekkoukan High School. However, she will not pay attention to your protagonist unless you have achieved the absolute pinnacle of academic excellence. You must completely maximize your Academics stat to Rank 6, known as Genius, before she agrees to spend time with you.
Mitsuru Kirijo Availability Schedule
Once you satisfy the initial conditions, planning your weekly schedule efficiently becomes paramount due to the limited time remaining in the game. Mitsuru is typically available on school days, specifically appearing on Tuesdays, Thursdays, and Saturdays. She does not offer meetings during extended school holidays, rainy days, or immediately preceding major exam periods.
During normal school weeks, you can find her standing quietly near the laboratory hallways on the first floor after classes dismiss. It is highly recommended to prioritize her events over early-game links that can be finished at alternative locations around Paulownia Mall. Managing her restricted calendar carefully ensures you will not be forced to choose between her final ranks and other late-game allies.
Maximizing Your Relationship Points
Progressing through the Empress Arcana smoothly requires bringing a matching Persona to every single interaction to boost your earned relationship points. Carrying any Persona belonging to the Empress Arcana grants a substantial multiplier to your dialogue choices, reducing the number of empty hangouts needed to trigger the next rank. Preparing these spiritual entities ahead of time in the Velvet Room is an essential strategy for optimal time management.
During her events, Mitsuru appreciates responses that show genuine respect for her heavy family responsibilities while gently introducing her to common civilian experiences. Showing an earnest interest in her personal growth and offering supportive, grounded advice yields the highest point values. Balancing your dialogue choices carefully allows you to easily navigate her unique character development arc and unlock her ultimate fusion rewards.

Does The Steam Deck Have A Microphone Features...
Valve's handheld gaming PC has completely transformed how players experience their PC libraries on the go. However, many newcomers frequently wonder if this portable machine can handle real-time multiplayer communication without external accessories. Understanding the audio hardware capabilities of the device ensures you can easily coordinate with teammates during intense online sessions.
The Dual Microphone Array Layout
The handheld console features a built-in dual microphone array located at the top of the screen next to the front-facing camera cutouts. This hardware design captures your voice clearly while utilizing smart acoustic physical properties to minimize background noise from the cooling fans. The integrated setup means you never have to carry a separate headset just to talk to your friends online.
Testing shows that the internal microphones perform remarkably well for standard voice communication in casual lobbies. Players can access the system settings menu to adjust the microphone gain levels according to their environmental surroundings. Keeping the vents unobstructed ensures that the voice capturing quality remains consistent throughout long gaming sessions.
Configuring Voice Chat in SteamOS
Operating within the Linux-based SteamOS environment grants players full access to the standard Steam chat platform directly from the quick access menu. You can easily start voice channels, manage friend lists, and configure push-to-talk settings while a game runs in the background. The user interface seamlessly translates desktop features into an intuitive mobile layout for effortless navigation.
Many popular multiplayer titles also feature their own internal communication systems that function out of the box. The operating system handles audio driver allocation smoothly, ensuring that active game code correctly identifies the internal input hardware. Adjusting your privacy preferences within the main system dashboard allows you to control which applications can access the microphone array.
Using External Headsets and Bluetooth Audio
For players who prefer a more private communication experience, the device includes a standard 3.5mm auxiliary jack alongside robust Bluetooth connectivity. Plugging a wired headset into the physical port will generally redirect the audio output while disabling the internal microphone array in favor of the headset mic. This hardware behavior ensures that room echo does not feed back into your party chat channel.
Wireless enthusiasts can connect their favorite Bluetooth earbuds to maintain full mobility during long travel sessions. It is worth noting that some wireless profiles may experience slight audio latency depending on the specific codec used by your accessories. Exploring the hardware options ensures you can find the perfect balance between wireless convenience and competitive performance.
Optimizing Third Party Applications Like Discord
Beyond the native Steam platform features, the desktop mode allows users to install popular communication utilities from the software discover center. Applications like Discord can be configured to run alongside your favorite titles in gaming mode by adding them as non-Steam shortcuts. This configuration lets you stay connected with cross-platform communities without needing a secondary mobile phone nearby.
When utilizing background applications, monitoring system memory allocation guarantees that your active games maintain stable framerates. Fine-tuning the input sensitivity sliders within third-party software prevents accidental broadcasting of standard button clicks or thumbstick movements. Embracing these advanced configuration options unlocks the absolute fullest potential of your handheld multiplayer adventures.

Broken Puppet Lies Of P Boss Guide
Mastering the unforgiving combat encounters in Lies of P requires patience, precise timing, and a deep understanding of mechanical enemy behaviors. Among the various mechanical monstrosities tearing through the ruined streets of Krat, puppet threats pose a significant challenge to players adjusting to the game's strict parry windows. Developing a reliable tactical strategy against these aggressive automatons will preserve your health pools and ensure steady progression through the dark narrative.
Understanding Puppet Attack Rhythms
Puppet enemies exhibit highly erratic movement patterns that can easily confuse players relying purely on visual reaction times. Many mechanical targets utilize delayed swings and sudden erratic lunges designed specifically to punish premature dodging maneuvers. Studying these distinct animation tells allows you to anticipate oncoming strikes and execute flawless defensive actions consistently.
Maintaining an aggressive frontline stance is essential for breaking the poise of heavy mechanical adversaries during intense skirmishes. Successfully executing consecutive perfect guards will gradually deplete an opponent's invisible stagger meter and open them up for devastating fatal attacks. Balancing your stamina consumption between defensive deflections and calculated counterattacks remains the definitive key to controlling the battlefield pacing.
Optimizing Character Build Configurations
Surviving late-game encounters demands a careful allocation of your core statistics to maximize both survivability and mobility. Investing heavily in your capacity attributes allows you to equip superior defensive parts and heavier weapon blades without triggering severe weight penalties. A lighter frame ensures your stamina regenerates rapidly, granting you the agility needed to escape dangerous area-of-effect hazards.
Selecting the appropriate elemental grindstones can drastically turn the tide of battle in your favor when facing resilient mechanical structures. Electric blitz damage disrupts internal clockwork components easily, inflicting extra shock status effects that amplify subsequent damage output. Combining these elemental properties with high-impact fable arts enables you to melt massive health pools during narrow windows of vulnerability.
Mastering the Crucial Second Phase
Reaching the final stage of major encounters triggers a massive spike in enemy aggression and introduces highly lethal combination attacks. Boss targets frequently combine rapid aerial gap-closers with sweeping blade strikes that can break standard blocks instantly. Remaining calm during these frantic sequences ensures you can identify the rare openings hidden beneath their relentless offensive pressure.
Utilizing specialized throwables like thermites and cluster bombs offers a safe method to inflict consistent damage from a distance. These consumable resources are incredibly effective for executing the final sliver of health when close-quarters combat becomes too risky. Spacing yourself properly allows you to safely deploy these tools while tracking the boss's movement across the arena floor.

The Outer Worlds Console Commands List
Obsidian Entertainment's sci-fi role-playing game provides players with a massive universe filled with corporatized planets, unique companion storylines, and diverse combat dynamics. While exploring the Halcyon Colony normally offers a deeply rewarding challenge, utilizing internal developer configurations entirely changes how you can interact with the environment. Exploring the system mechanics grants adventurers total authority over their attributes, inventory items, and general game physics during their journey.
Enabling the Developer Menu Interface
Accessing the underlying cheat mechanics in this space adventure requires a few external steps since the developers did not include a native toggle button in the retail release version. Players generally need to download a specialized engine injector tool that unlocks the classic tilde key functionality within the Unreal Engine infrastructure. Once the software is properly running in the background, tapping the designated keyboard shortcut brings up the text input line smoothly.
Before attempting to modify your game files, it is highly recommended to back up your primary save progress to prevent potential file corruption. Activating these secret configurations can occasionally disable regular achievement progression for that specific character profile. Taking these safe precautionary measures ensures that your original milestones remain perfectly intact while you experiment with various sandbox elements.
Altering Character Attributes and Stats
Once the communication window is fully active, you can modify your companion relationships, skill levels, and individual perk points instantly. Entering specific numerical strings allows you to max out your dialogue capabilities to bypass complex corporate arguments without needing traditional gear upgrades. This mechanical control is perfect for players who wish to experience alternative story paths without spending hours grinding for experience points.
Adjusting your primary physical attributes directly influences how much gear your character can transport across the galaxy. You can instantly eliminate encumbrance penalties by increasing your carrying capacity stats through simple input codes. This strategic adjustment lets you hoard valuable loot from every abandoned colony outpost without slowing down your movement speed.
Manipulating Inventory and Sandbox Physics
Surviving the hostile wildlife on Monarch becomes significantly easier when you possess unlimited ammunition and perfect technological weapons. Players can spawn rare firearms, unique scientific gadgets, and high-tier armor sets directly into their personal inventory bags at any moment. This capability removes the financial stress of dealing with expensive corporate vending machines scattered across the stellar maps.
Beyond acquiring heavy weaponry, entering commands allows you to manipulate environmental systems like gravity levels and standard game rendering speeds. Toggling the legendary god mode prevents your character from taking damage during intense firefights against corporate soldiers. These fun adjustments turn the challenging survival landscape into a fully customized virtual playground where you dictate the fundamental laws of nature.